8. Authentication and authorization
Authentication and authorization are important, yet quite difficult topics in web development. In their most basic form, these are not so difficult to implement, but the struggle arises from all the needs related to these: two-factor authentication, forgotten passwords, access control, etc. And security. Especially security.
The issue with web applications is that each request-response pair is handled as an individual transaction. This means you usually need to verify the identity of the user at each request. At the same time, some endpoints are often available to everyone, both authenticated users as well as guests, and some endpoints are available to guests only (e.g., login, register).
In addition to checking whether a request comes from a logged-in user or a guest (checking for identity), you might also want to check whether the user has the right to perform the operation they have requested to perform on your system (checking for authorization).
Authentication vs. authorization
Authentication is establishing the identity of the user.
Authorization is about establishing the rights of the (identified) user.
For these, the HTTP status codes provide the corresponding error codes:
401 Unauthorized- You did not authenticate correctly.403 Forbidden- You are authenticated but not authorized, i.e., you do not have the right to carry on.
Remember the status codes from chapter 2?
| Response code | Response family |
|---|---|
1xx |
Informational resposes |
2xx |
Success responses |
3xx |
Redirect responses |
4xx |
Client errors |
5xx |
Server errors |
4xx client errors, aside from 404, often originate from authentication- or authorization-related errors. That is, accessing certain actions that are not permitted will cause an error, such as 403 Forbidden.
HTTP authentication headers
HTTP protocol defines security access control methods. First, a client asks for a page with HTTP GET nethod. Then, a server sends back a response HTTP/1.0 401 Unauthorized. In addition to this status code, the servers response - also known as challenge in this context - comprises authentication instructions. These are the type, as well as other needed information.
The more simple one of these is called the Basic access authentication:
| Type | Response header with status code 401 | Request header with required info |
|---|---|---|
| Basic | WWW-Authenticate: realm=Basic, charset="UTF-8" |
Authorization: Basic B64_auth |
With basic auth, the autorization info is transmitted as Base64 encoded string, which is super trivial to reverse. Because of this, basic auth is non-secure unless used in conjunction with TLS (HTTPS, coming up next).
The other authentication method is Digest access authentication. With digest, the response header with status code 401 is as follows:
WWW-Authenticate: Digest realm="test@host.com",
qop="auth,auth-int",
nonce="dcd98b7102dd2f0e8b11d0f600bfb0c093",
opaque="5ccc069c403ebaf9f0171e9517f40e41"
To which the client can reply with a request header with the required info like this:
Authorization: Digest username="Mufasa",
realm="test@host.com",
nonce="dcd98b7102dd2f0e8b11d0f600bfb0c093",
uri="/dir/index.html",
...
opaque="5ccc069c403ebaf9f0171e9517f40e41"
| Extra: Wikipedia - Digest access authentication
In addition to these, we have also Token-based authorization such as OAuth and JSON Web Token (JWT). For example with JWT the response header with status code 401 is:
WWW-Authenticate: Bearer realm="example"
To which the client can reply with request header with required info:
Authorization: Bearer <JWT_TOKEN>
And finally, we have Session-based authorization with cookies. The 401 response can have:
Set-Cookie: <cookie-name>=<cookie-value>;
... to which the client can reply with request header:
Cookie: <cookie-name>=<cookie-value>
HTTPS for transport layer security (TLS)
HTTPS makes HTTP more secure with encryption using TLS. TLS encryption is based on the same RSA cryptography as SSH. By default, browsers assume the protocol is HTTP and try to communicate with the server on the port 80, unless you specify otherwise. If you prefix the URL with https:// instead of http://, the browser will attempt to use the HTTPS protocol, which the server - by convention - should be listening for on port 433. However, the server may also accept HTTP on port 80 and perform a redirect to HTTPS:433 without the client needing to do anything.
| Protocol scheme | Port |
|---|---|
http:// |
80 |
https:// |
433 |
HTTPS comes in two flavours: simple (one-way) where a server is verified or mutual (two-way) where both server and client are verified.
| Extra: TLS/SSL Explained
TLS handshake
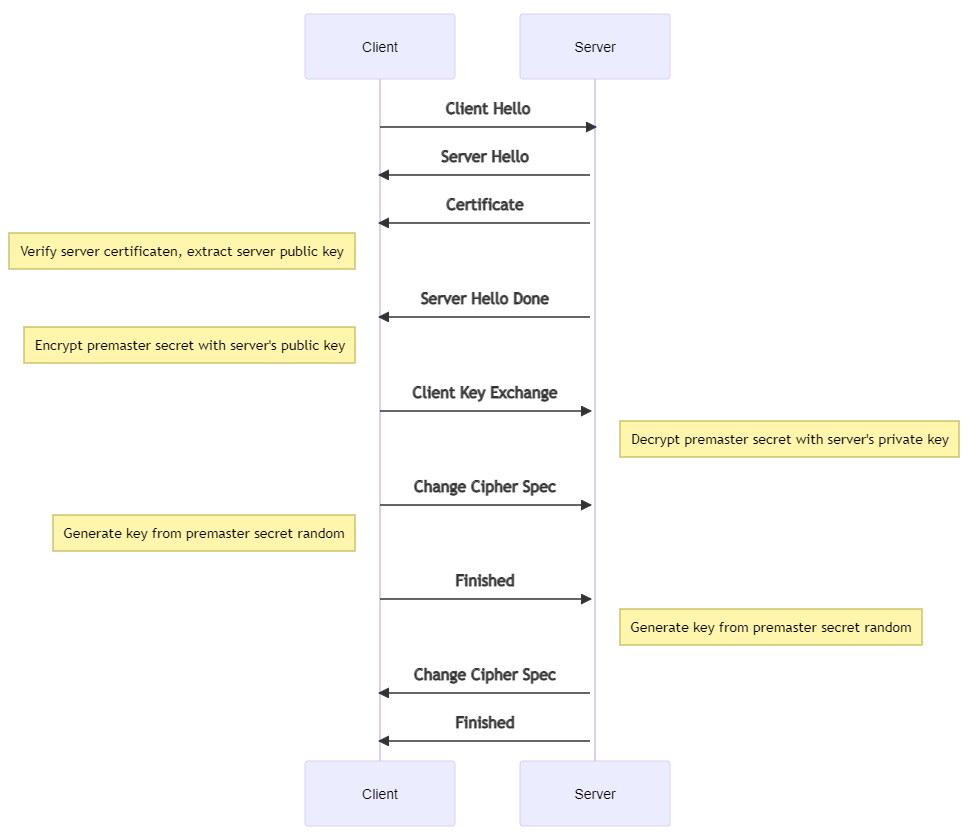
- Client hello: With you I want privately to talk - here SSL versions I support (+ protocol version and client random)
- Server hello: .. to be able to verify my id implies that some CA my public key certifies (+ cipher suite and server random)
- Digital signature = selected data encrypted with the server's private key. Decryption successful only with the server's public key.
- Client: Which kind of certificate authority (CA) is it, just a sec, the trustworthiness of it I must check. OK, the root CA seems authentic, your public key got, soon we click. (This is one-way, since the client checks the server and not vice verse.)
- Both calculate the premaster secret: Instead of the client generating the premaster secret and sending it to the server, as in an RSA handshake, the client and server use the DH parameters they exchanged to calculate a matching premaster secret separately.
- Session keys created: Now, the client and server calculate session keys from the premaster secret, client random, and server random, just like in an RSA handshake.
- Client is ready and server is ready. Encrypted communication starts.
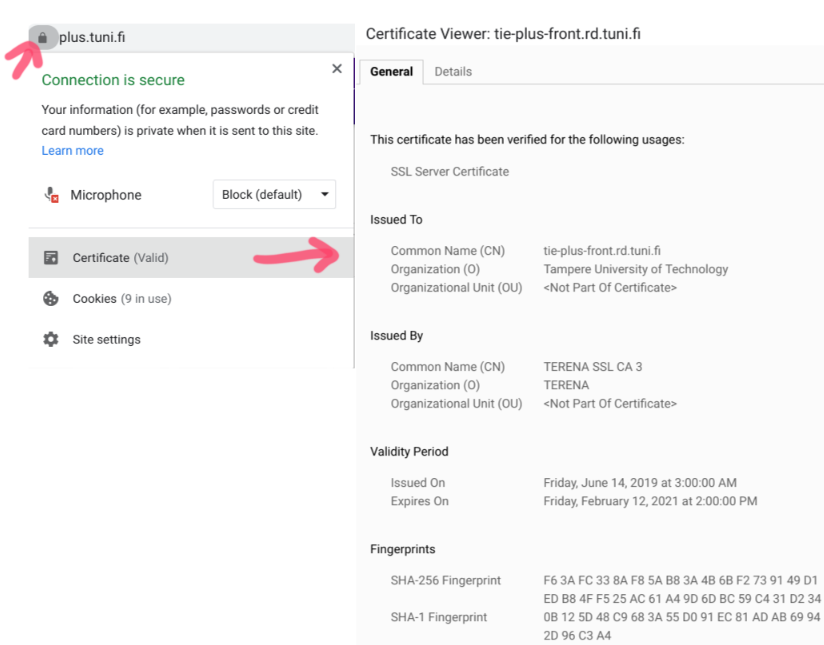
Certificates
Certificates relate to HTTPS, but are not actually required for HTTPS: certificates are used to verify identity, not to secure data transmission. You can achieve secure connection by serving your site using HTTPS. But doing so without a certificate will result in most browsers with a warning, that the site is possibly dangerous. Certificates have to do with trust. For encryption only, you can create your own certificate easily and configure the server to use it by so-called self-signing. The self-signed certificate does not provide identity verification.
| Extra: SSL certificate self-signing instrcutions in Heroku
The trust aspect is satisfied with a top-down process: a top-level certificate holder issues certificates to others. Traditionally, these have been commercial ones (see prices), but services like Let's Encrypt offer them also for free. The current TUNI recommendation for servers required for research purposes for a short time is to use Let's Encrypt.
But how do you go about setting up SSL/TSL with Node.js servers? We'll get to that, but we need to first discuss some topics leading to that.
Reverse proxy
Chances are you are already familiar with forward proxies, especially if you've frequeneced LAN parties in the past. Reverse proxy functions in a bit similar way.
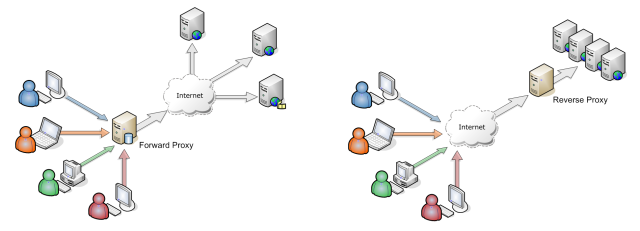
| Forward proxy | Reverse proxy |
|---|---|
| client's facade for the outer world | server's facade for the outer world |
| hides addresses of the organization's subnet | can implement TLS |
| before NAT, popular solution to multiply the address space in use | can add security by defining stricter rules, such as which TLS version is accepted |
| caches popular sites, reduces network traffic | often in combination with node servers |
| unlike NGINX or Apache, node server focuses more on app logic than network handling | |
| can be used as a load-balancer |
Reverse proxy for TLS termination
One way to implement TLS for websites is to use a reverse proxy. The proxy is then called a TLS termination proxy.
TLS termination proxies can:
- work-around insecure TLS implementations of clients
- enable better TLS configuration and security policies
- implement certificate-based authentication, a server should provide its certificate for the purpose
- tunnel plain text in TLS
- inspect and analyze encrypted traffic
NGINX as reverse proxy
NGINX, pronounced "engine x", is a popular server software. Personally, I started with Apache, then moved to NGINX, and now reach for NGINX by default. NGINX is a versatile and configurable solution for building servers. It can be used to serve HTML directly as well as to direct requests to other processes. As reverse proxy, NGINX proxies a request, decrypts it and sends it to a Node.js server. After node sends it back, the proxy fetches the response, encrypts it and sends it back to the client.
NGINX Unit 1.5 (released in 2018) enables dynamic configuration of SSL/TLS certificates:
"NGINX Unit is configurable on the fly, without relying on static configuration files and requiring process reloads. With NGINX Unit, certificates can be uploaded and applied dynamically, with zero downtime and no changes to the application processes. Besides quick and easy configuration, use of TLS with NGINX Unit relieves Node.js engineers from the burden of implementing encryption in the application code itself. Now Node.js apps can be deployed into a larger production environment faster, more safely, and with no downtime." - NGINX Unit
| Extra: NGINX - 5 performance tips for Node.js applications
Authentication types - Basic, Digest, and Token-based systems
You might be most familiar with login systems build around HTML forms. But those are not the only option. Your browser is happy to ask for your login credentials and transfer those to the server. Let's go over some authentication strategies.
So, like discussed before, HTTP Basic is the most simple authentication header type and perhaps the most simple way to authenticate users. The flow of the authentication is as follows:
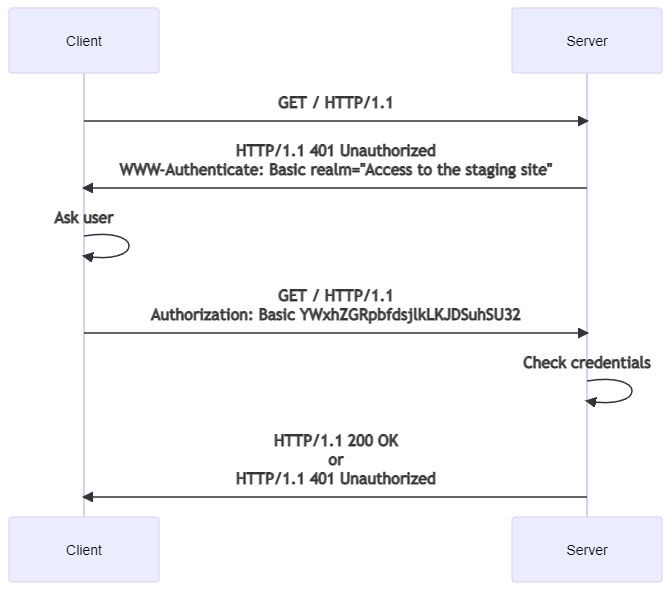
- Client requests a protected resource
- The server responses with a
401response with a headerWWW-Authenticate, for example,WWW-Authenticate: Basic realm="my secret stuff" - Client constructs a string "username:password", which is encoded with Base64:
const B64_auth=window.btoa(username + ':' + password);. Encoding primarily ensures valid ASCII chars of this string, and secondarily obfuscates it. Encoding is by no means the same as encryption. - The authorization method and a space (
) is put in the header before the encoded string. For example,Authorization: Basic QWxhZGRpbjpvcGVuIHNlc2FtZQ==. The authorization will be valid until the browser is closed.
| Extra: Mozilla Developer Network - Basic Access Authentication
In Basic auth, username and password are sent in every request and in an encoded, not encrypted, form. Thus, for more security, HTTPS must be used. Actually, arguably all traffic should now be encrypted, as there is quite small performance penalty compared with the added security.
For security reasons, also the embedded credentials style below is obsoleted:
https://lassi:secret_pw@www.some-site.com
In Chrome, the support was dropped first without wider discussion in standardization bodies, see https://www.chromestatus.com/feature/5669008342777856 and LMakarov: Goodbye to embedded credentials!
Restricting access with Apache and Basic authentication
Practical implementations require server configurations and go outside the scope of this course, but without some concrete example, it might be difficult to understand this authentication scheme at all. In practice, the server would have two files, .htaccess and .htpasswd. The .htaccess file would typically look like this:
AuthType Basic
AuthName "Access to my site"
AuthUserFile /path/to/.htpasswd
Require valid-user
... while the .htpasswd could look like this:
aladdin:$apr1$ZjTqBB3f$IF9gdYAGlMrs2fuINjHsz.
user2:$apr1$O04r.y2H$/vEkesPhVInBByJUkXitA/
So, the .htpasswd contains a username, followed by a colon (:), and a hashed password with one user per line. The .htaccess file tells the web server that the files in this folder should not be served without first prompting the client to provide their credentials. In most browsers this would trigger a prompt windows, much like JavaScripts prompt(), but with username and password fields.
HTTP Digest adds encryption to HTTP Basic authentication. The server sends an extra singe use value: nonce. Nonce and other values are joindes together and an MD5 sum is calculated and sent back. The server then does the same and compares hashed values. If values match, access is granted.
Wikipedia has a detailed example of Digest authentication.
Cons of HTTP Basic and Digest
- Basic and Digest authentication remain "open" for as long as the browser window is open - there is no logout.
- A password is neede with both HTTP Basic and Dogest. This makes them poor choises for services, that is, you wouldn't want to make API calls with username and password.
- These authentication types provide no control to the look and feel of the authentication form, since the browser takes care of styling.
Form-based (cookie-based) login
This might be the most familiar to most web users.
HTML forms can be used for authentication when HTTPS is used, and hence the traffic is encrypted. The login information should be sent over POST.
GET or POST
Use GET in cases where it would make sense to bookmark or share the URL with the parameters, for example https://www.google.com/?q=xkcd. If sharing the parameters does not make sense, perhaps POST makes more sense.
The server will proceed to check the login information and send, as a part of the response, an authentication/session cookie on successful login. On subsequent requests, the cookie is used for authentication. Logout is achieved by deleting the cookie.
Authentication is easy to get wrong which is why using, for example, modules such as Node.js Express middleware for authentication and session control is a good idea.
Token-based authorization
Once authentication is dealt with, what should happen on the subsequent requests? Cookie-based authentication keeps sending the authentication/session cookie with every request, thus the session can be kept "alive". But for API use especially, a cookie-based solution is not optimal. Instead, we can use token-based authorization.
So,
- a token is sent to a client after a successful authentication.
- The token is stored by the client.
- No session information is stored on the server, not even the token.
- The token is sent and verified with each request.
- Use HTTPS for security (as always).
The token authentication may be enhanced with mobile phones serving as additional code generators: they generate security passcodes for accessing the network. For instance, a user receives a one-time passcode (a soft token) limited in time to, for example, 60 seconds.
JSON web token (JWT)
JSON web tokens:
- are an open standard (RFC 7519 updated by RFC 8725, Feb 2020).
- are URL-safe JSON-based security tokens that contain a set of claims that can be signed and/or encrypted.
- transmits verified and signed information between parties as JSON objects.
- Signing may use e.g. a secret or public/private key pairs (RSA).
- are still vulnerable to substitution attact (reuse of token for unintented sites) also known as cross-JWT confusion, injection attacks, and server-side request forgery.
- Mitigations include:
- sanitation of key ID
- checking received claims
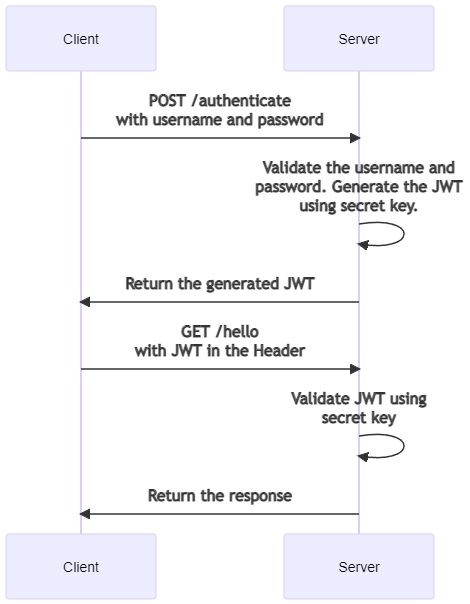
JWT generation follows form-based authentication. A page contains a login form with username and password that are POSTed to a server.
The server authenticates the user and encrypts user data into a JWT with a secret. JWT is sent back to the client in response. The client stores the token, for example, in localStorage, and sends a header in every subsequent request:
headers: {
    "Authorization": "Bearer ${JWT_TOKEN}"
}
The server receives and validates the JWT before proceeding: since JWT is generated with a secret key, the authenticity of a request can be checked with the key.
Shared and combined authentication
"Let someone else worry about authentication."
The basic idea is that user has credentials to some other system and those credentials can be shared with the system user wants to access. "Log in with Facebook" or "Log in with Google" exemplify this.
Popular schemes are:
- OAuth, for example, Facebook and Google authentication
- Shibboleth, used in TUNI authentication
Different authentication systems can also be combined: multiple authentication schemes may serve different purposes, for example, form-based login is provided for humans and token-based authentication (API key) for RESTful services.
HTTP Cookies and Session cookies
"When receiving an HTTP request, a server can send a Set-Cookie header with the response. Afterward, the cookie value is sent along with every request made to the this server as Cookie HTTP header. Additionally, an expiration date can be specified. Restrictions for a specific domain and path can be specified as well." Mozilla Developer Network - Cookies
HTTP Cookies are often used for session/login management. Remember chapter 2, where we discussed how cookies are a common way to handle state?
HTTP Cookie, or web cookie, browser cookie, ...
- is a small piece of data, that a server sends to the client in response headers.
- is stored by a browser and sent back with the next request to the same server.
- typically, tells if subsequent requests are coming from the same browser - and keeping a user logged-in, for example.
- provides a "state" for stateless HTTP protocol.
Set-cookie on server-side
Set-cookie HTTP response header sends cookies from a server to a client. A simple cookie is set like this:
Set-Cookie: 'cookie-name'='cookie-value'
Here, the server tells the client to store the following cookies:
HTTP/1.0 200 OK
Content-type: text/html
Set-Cookie: yummy_cookie=choco
Set-Cookie: tasty_cookie=strawberry

[page content]
With every new request to the server, the browser will send back all previously stored cookies using the Cookie header:
GET /sample_page.html HTTP/1.1

Host: www.example.org
Cookie: yummy_cookie=choco; tasty_cookie=strawberry
Cookies for storing data?
Yes, in "ye olden days" of web, cookies were used to store application data. There is, however, the downside, that all cookies are sent back and fort on every request creating extra network traffic. Because of this, you should now use, for example, local storage instead of cookies for application data. Let's leave cookies for session use.
In Node.js, a cookie is set with the following command:
response.setHeader('Set-Cookie', ['foo=bar', 'bar=baz']);
... or with details:
response.setHeader('Set-Cookie', ['foo=bar; Expires=Wed, 21 Oct 2020 07:28:00 GMT', 'bar=baz']);
Cookies of the request can be printed with the following command:
'Cookies: ' + request.headers.cookie;
Long-living session cookies
Normal cookies are deleted when a clien is closed. Making a cookie "permanent" requires Expires or Max-Age directive, that:
- expires at a specific date (Expires) or after certain time (Max-Age). For example
Set-Cookie: id=a3fWa; Expires=Wed, 21 Oct 2020 07:28:00 GMT; Secure; HttpOnly; SameSite;. - is renewed per session that makes it look like a browser was never closed.
- Secure; HttpOnly; SameSite; are recommended attributes for more security.
In addition, web browsers may use session restoring and revive sessions.
Having gone over the basics of both cookie and JWT based authorization, which is better? Well, that depends. Many HTML form based login systems still use cookie-based authorization. But once you move to SPAs (single-page applications) and APIs, a JWT may server you better. Here's sequence diagrams of both approaches. First, the traditional cookie-based auth:
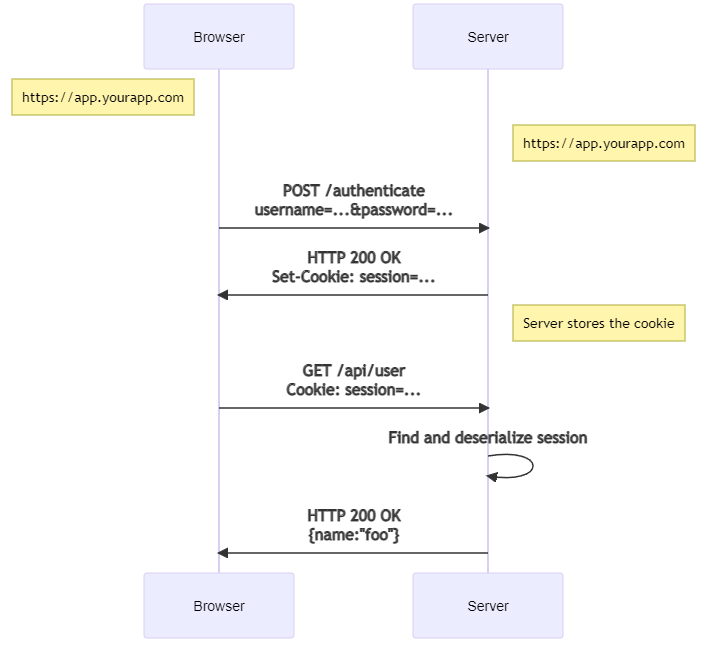
When sessions are used in server-side authorization, server sends an encrypted session id to a user. Next time the request comes from this user, the user can be authorized based on the session id. First, it is decrypted and then searched from the session store.
Then the modern token-based auth:
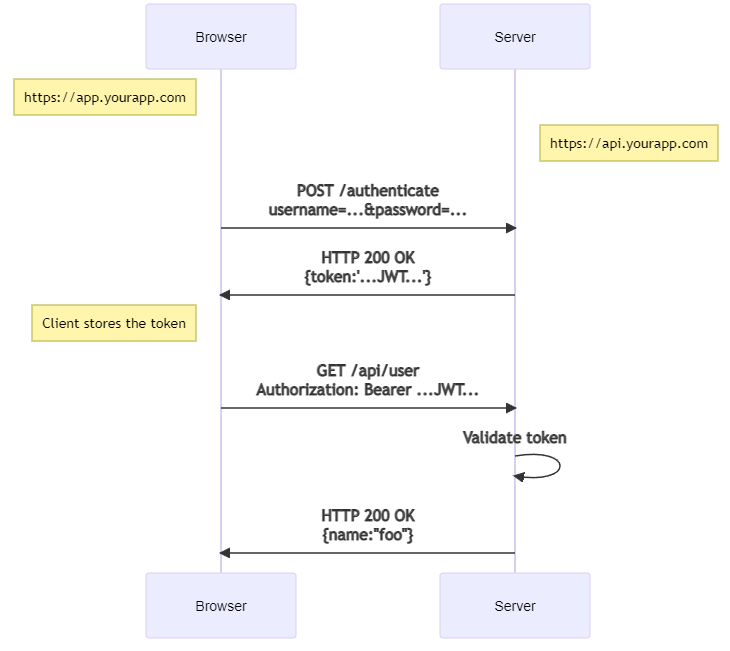
Notice also the change in the endpoints - the token-based approach communicates with the back-end through an API, while the traditional cookie-based approach has the front-end and the back-end more tightly knitted (in this example).
Moving to the front + API approach allows easier swapping of the front - for example from HTML to an Android app.
Both token-based and session-based authorization have their benefits:
| Token-based authorization | Session-base authorization |
|---|---|
| stored in the client-side | stored in the server-side |
| single-sign-on support between services of the same provider (shared secret key) | no additional overhead of "claims" |
| if combined with "claims" provides fine-grained permission options | simple - thus more maintainable |
| no issues with cookies | easier to setup/integrate as well as less costly |
| scales better in case of a huge number of users, which is often the case with micro-services | capable of providing slightly more robust user experience |
| more modern; popular in RESTful APIs and micro-services | legacy of older web apps + ofter better support in scripting langs (e.g., PHP) and frameworks (e.g., Spring) |
They also have security concerns (remember, that authorization must be combined with HTTPS, otherwise security is totally lost):
| Token-based authorization | Session-base authorization |
|---|---|
| claims and their creative combinations exploited in attacks | bad practices, such as exposing Session IDs in the URL, compromise the security |
| not vulnerable to CSRF but XSS attack (to steal token) | protected further with such cookie attributes as: |
| in case of successful XSS, the JWT token cannot be invalidated, but it required switching the secret key in a server, thus logout of all the users | Secure; |
| things to be extra cautious with are password and permission changes, if something bad happens, recovery is not simple | HttpOnly; no javascript access |
| SameSite; no cross-site sending, protects agains CSRF-attacks |
Disclaimer: for Node.js apps, express and its security middleware, in particular helmet are highly recommended, if app is in production.
Obsolete: cookies as a client-side storage
Cookies were once used for general client-side storage. Lack of other viable options legitimated the practice. Now-a-days, modern storage APIs are recommended.
Modern APIs for client storage are the Web storage API (localStorage and sessionStorage) and IndexedDB, introduced in the next chapter.
Cookies are sent with every request, so they can worsen performance (especially for mobile data connections).
Role-based access control
User roles and access rights
This far we have been discussing a binary authorization scenario - a user is either approved or not to do something. In most applications this is not enough. We do not want all users to be superusers with unlimited rights. Instead, we might want to separate users as customers, maintainers, and administrators, for example, and set different rights for each role. This middle layer of user role is required so that we do not need to micro-manage each individual users rights.
For defining roles and permissions, role-based access control (RBAC) is a popular method.
Each user has a role and id specified. It is also possible to have one or more roles per user. RBAC grants rights to operations instead of data objects. For example, all users with the role of maintainer have the right of deleting comments.
Conditions can be combined. For example, access is OK, if resource.owner == 29 or resource.role == 3.
RBAC and CRUD
REST API defines URLs for resources, for example, for all devices: /api/devices and for one specific device: /api/devices/{id}.
REST targets a uniform data handling with HTTP methods; correspondence with create-read-update-delete (CRUD) in databases.
| HTTP method | Operation in DB | REST semantics |
|---|---|---|
| GET | SELECT | read resource(s), both URLs possible |
| POST | INSERT | create resource, new item as JSON payload, use 'all URL' |
| PUT | UPDATE | update resource, use 'id URL' |
| DELETE | DELETE | delete resource, use 'id URL' |
Complication: REST principles cannot be mandated. For example, GET is meant to be idempotent and safe without side-effects, yet this cannot be guaranteed.
Operations can be controller with RBAC. Auth type can vary.
Summary
Authentication and authorization are an important aspect of creating secure applications. With HTTP, each transaction is authorized individually. And you need to make checks on the frontend as well as on the backend. On the frontend, it wouldn't make sense to show the user controls for features they do not have the right to access. And on the backend, you need to be prepared that the user will try to "cheat" the frontend checks and access the restricted features anyways.
If you're exposing an API, instead of serving server-rendered views, JSON web tokens are a fitting solution for authentication. If you stick with server-rendered views, you're most likely better served with a session cookie.