1. Setting up the tools
Git version control system
The motivation for version control - and the underlying issue that a version control system attempts to solve - can perhaps be best illustrated with an imaginary email coming from your colleague:
"Can you email me the current home page html-file...?"
When you need to share documents with others, that is, make copies of a document, it becomes difficult to keep their contents in sync. Soon, there are multiple copies of the same document but with different content. Also, even if you are the sole editor, sometimes you might want to retain old versions for whatever reason, and soon your folder might look something like this:
$ cd public_html
$ ls

    May 15 20:24 index_old.html
    Jul 14 23:10 index_NEW_LOGO.html
    Jul 14 22:44 index_html_v1_final.html
    Sep 12 09:44 index_old_OLD.html
    Oct 14 22:44 index_html_v1_final_FINAL.html
    Nov 15 16:10 index_html_old_v1_FINAL_OCTOBER_DRAFT.html
These are just some, not all, issues that a version control system can help you with. One of the more popular version control systems is Git, although many others exist. Git can be downloaded for free from http://git-scm.com/. It is a line-based version control system. That means that if one character is changed on one line, that one line is considered altered. This makes it effective even when using large files.
GitLab is an online service for hosting your Git repo, well, online.
You can learn a lot more about version control and Git by reading the ebook on the Git homepage. Sections 2.2 - 2.5 of the said book cover most of what is needed on this course.
There is also a 1 ECTS GitLab course in Plussa.
Git workflow
So, let's imagine you need to make a change to some file in a remote repo, be that in GitLab or GitHub or some other service, the workflow might look something like this:
// Clone the remote repo
git clone git:URL

// Make changes to some file
// ...
// pull possible changes from the remote repo
// in case someone has made changes there during your coding session
git pull

// Add the file you edited to the staging area
git add FILE_NAME;

// Commit your changes to your local copy of the repo
git commit -m "DESCRIPTION" FILE_NAME;

// Push the changes to the remote repo
git push;
Merge conflicts
When working alone, you don't really need to worry too much about anything. But if multiple people are working on the same project, there is a possibility that more than one person make a change on the same line of the same file. Remember that Git is line-based? This means that more than one person can edit the same file at the same time, even adding or removing lines, without any problems as long as they do not edit the same line. But what happens when they do edit the same line at the same time? Let's imagine two people pull code from online repo to their computers. They both proceed to edit file.txt and make a change to the first line. Person A pushes the changes to the remote repo. A merge conflict can occur when person B pulls before pushing their changes or when person B pushes their changes without first pulling. Either way, the conflicted file looks like a mess:
$ cat file.txt
<<<<<<< HEAD
This is person B's brand new first line
=======
This is person A's totally awesome first line
>>>>>>> new_branch_to_merge_later
Don't worry. It is not as difficult as it may seem. You see here the two conflicting lines and can choose which to keep. That extra markup is just text - you can remove it by hand when you have chosen which line to keep. But many editors also detect that extra markup and can offer tools for accepting current change, accepting incoming change, etc.
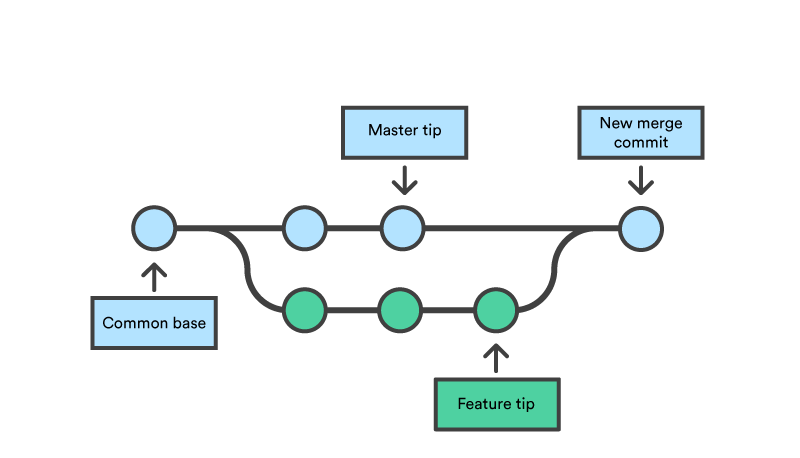
Branches
Branches are a good way not to break existing functionality when implementing more, for example. You can leave one branch of the code to be at a state you deem acceptable and begin working on a new feature on a separate branch without worry that in the end, you are left with no working code at all. Also, the other branch, let's call it main, can be coded further simultaneously. If the feature is a bust, you can delete that branch and return to main. But if the feature is completed and deemed suitable, it can be merged into the main branch.
You can create new branches with the command git checkout -b BRANCH_NAME. The new branch will be the one left open. You can push branches to the remote repo with git push origin BRANCH_NAME. And you can list all branches with git branch -a.
So, you have checked out a branch for a feature and merrily coded away. Now, how do you merge the new branch back to the main branch? Well, you first need to check out the main branch (the branch to which you want the new code) with git checkout main and then merge the other branch onto main with git merge BRANCH_NAME main.
What's the difference between main and master?
There is no difference. The default main branch name was changed from master to main, because it was felt that the word master had too much negative historical payload.
Using Git to return exercises
Plussa exercises are returned using Git.
To get started you need to install git to your computer. Then, you need to log in to TUNI GitLab with your TUNI account: https://course-gitlab.tuni.fi. You need to generate an ssh-key for your machine and set that to GitLab. Then, clone your own git repo to your local computer. Set the upstream to pull exercises (this is part of the first exercises). Proceed then to solve the exercises as told in the instructions. Add your changes, commit, and push. Complete the exercise by submitting your solutions git URL to Plussa.
Check exercises hello_gitlab and hello_git to get started.
Node.js
“Node.js® is a JavaScript runtime built on Chrome's V8 JavaScript engine. Node.js uses an event-driven, non-blocking I/O model that makes it lightweight and efficient. Node.js' package ecosystem, npm, is the largest ecosystem of open source libraries in the world.”
Node.js executes JavaScript. You are most likely at least aware of JavaScript, as it is the only scripting language run on browsers. If you have experience with Python, PHP, Ruby, or the like, there's nothing special about dynamically typed, just-in-time compiled languages for you. But if your background is solely on C/C++, Java, or C#, you might find it surprising how JavaScript code is organized. Looking at simple Hello World examples with those languages, you see many similarities in the structure:
#include <iostream>

int main()
{
    std::cout << "Hello World!" << std::endl;
}
using System;

class HelloWorld
{
    static void Main()
    {
        Console.WriteLine("Hello World!");
    }
}
class HelloWorld {
    public static void main(String[] args) {
        System.out.println("Hello World!");
    }
}
These languages have a main method denoting the starting point of the application. They also have access modifiers and typed return values. A Hello World in JavaScript is much simpler:
// JavaScript

console.log("Hello World!");
There is no clear starting point for the application. There's lines of code that will be executed in order. So, the structure of applications relies more on best practices and developer discipline than what is forced by the language. When the execution environment is Node.js (instead of a browser), the convention is to name the starting file index.js, but if you write, for example, command-line utilities, there's nothing wrong with naming them more descriptively (e.g., list-file.js, calculate-averages.js, print-file-tree.js).
We'll go over the JavaScript language in more detail in a later chapter, but for now you should know that JavaScript is a dynamically typed language. This means, that you do not define data types for variables and that the data type of a variable can change during execution. Once again a simple comparison with another language might be illustrative:
#include <iostream>

int main()
{
    int answer = 42;
    bool myBoolean = true;
    string myText = "Hello";

    // Oops! This is not going to work, because answer is an int
    answer = "to life the universe and everything";
}
using System;

class HelloWorld
{
    static void Main()
    {
        int answer = 42;
        bool myBoolean = true;
        string myText = "Hello";

        // Oops! This is not going to work, because answer is an int
        answer = "to life the universe and everything";
    }
}
class HelloWorld {
    public static void main(String[] args) {
        int answer = 42;
        boolean myBoolean = true;
        String myText = "Hello";

        // Oops! This is not going to work, because answer is an int
        answer = "to life the universe and everything";
    }
}
let answer = 42;
let myBoolean = true;
let myText = "Hello";

// This is fine
// typeof answer is now 'string'
answer = "to life the universe and everything";

let i; // typeof i: 'undefined'
i = 1; // typeof i: 'number'
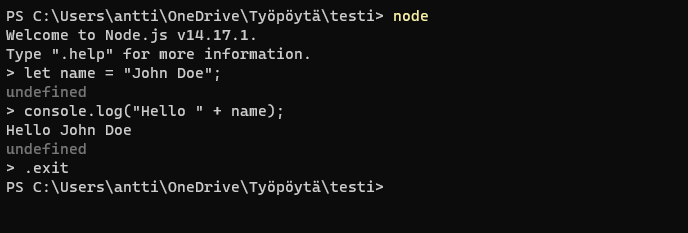
You can execute JavaScript using Node.js by writing node filename.js, or by using the included REPL (read-execute-print-loop):
Of course, if you just want to quickly test something really simple, you can use your browsers included console (Ctrl+Shift+C):

For a simple, single file application, all we need to do is to write the actual operations one after another and not worry about first introducing a class with a main method. For example, let's write a super simple utility application in Node.js in a file named list-files.js:
// fs is a built-in module for file system operations
// require('') is a bit similar to #include <iostream>
// or using System;
const fs = require('fs')

// define a variable for the current folder path
let dir = '.';

// if we have a command line argument, use that for the path instead
if(process.argv[2]) {
    dir = process.argv[2];
}

// read files in folder into an array
let files = fs.readdirSync(dir);

// loop through the array of file names
files.forEach(filename => {
    // and write each to the console
    console.log(filename);
});
You can execute the utility with the node list-files command. This application will print the names of the files in a folder to the screen and then close itself because no operation requires it to stay open. A web server application, on the other hand, would stay open, waiting for requests. In that case, you can stop the execution with Ctrl+C.
Node.js is a relatively new (first released in 2009) platform for developing web applications, application servers, network server or client, and other, more general-purpose programming needs. You can write console utilities with it, but its biggest use seems to be in networked applications.
It is designed for extreme scalability in networked applications through a combination of server-side JavaScript, asynchronous input/output operations, and asynchronous programming. While it is relatively new, it has still quickly grown in prominence and is now used by many companies, both large and small, for large-scale projects.
Node.js is a JavaScript runtime built on Chrome's V8 JavaScript engine. In the browser context, we are forced to write JavaScript, since we do not have any real alternatives. In the server context, we have no shortage of alternatives and since we have HTTP as a mediator between the frontend and the backend we can write backends with any suitable language even when the frontend code is JavaScript. However, there are certain obvious synergy benefits in writing both the backend and the frontend using the same language:
- The same programming staff can work on both ends of the wire
- Code can be migrated between the server and the client easier
- Common data formats (JSON) between the server and client
- Common software tools exist for the server and client
- Common testing tools for the server and client
Still, this benefit might not be that great, that everyone should only write JavaScript for their backends for this reason alone. Node.js is also very suitable for an architectural style called microservices, which better warrants its use in this course. Also, the network layer of Node.js is low level, putting the programmer very close to the protocol requests and making them implement precisely those HTTP headers that should be returned in responses, which is ideal for a course like this. A higher-level framework could hide many of the underlying mechanisms and a student might only learn the framework.
Node.js uses a single-thread architecture. This is uncommon among other application platforms, where threads are widely used to scale an application to fill the CPU. Threads, however, bring inherent complexity and an increased memory footprint. Node.js claims to have a low memory footprint, high throughput, better latency profile under load, and a simpler programming model.
With a single thread, we must use asynchronous code execution: a blocking call blocks the entire application server until its execution completes. In multi-threaded application servers concurrency (the ability to handle multiple concurrent requests) is implemented in such a way that if a request causes a blocking function call (typically waiting on an input/output operation to finish) the thread is suspended waiting for the result to complete. When one thread is suspended, another can execute. This causes the application server to start and stop the threads to handle requests, with each thread consuming a full call stack of memory.
Node.js thinks differently about concurrency. It has a single execution thread with an event loop that dispatches events to handler functions as things happen. Instead of using requests that would block the execution thread, Node.js executes them asynchronously with the results on or errors triggering an event. Any operation that takes time to complete must use the asynchronous model, or Node.js is not going to offer good performance.
Node.js is event-driven. The Node.js architecture is based on dispatching blocking operations to a single-threaded event loop, with results arriving back to the caller as an event that invokes an event handler function.
If synchronous/blocking and asynchronous execution are novel concepts for you, don't worry, we will cover them a lot in this material. But as a teaser, consider the following synchronous code:
results = query('SELECT * FROM users');
doSomethign(results);
This code will take some time to execute and the doSomething() call will not execute until the query results are available. This is called blocking code, as the execution of this one call will block the rest of the lines from executing while it is doing its thing. The simplest way to turn this synchronous code into asynchronous code in JavaScript is by using callbacks. We will cover callback functions in more detail later, but for now, it is enough to know that the executing operation will call back once it has been completed and meanwhile the next lines will continue to execute:
query('SELECT * FROM users', function(error, results) {
    if(error) throw error; // handle errors

    doSomethign(results);
});

// results are not available here,
// but other stuff can happen while
// we wait for the query results
doSomethingElseInstead();
All of these architectural choices have led to Node.js being really fast. In one comparison Node.js could handle eight times the number of requests per second with the same latency as Apache. Further, Node.js stacks scaled linearly until CPU usage hit 100%. LinkedIn moved their mobile apps server code from Ruby on Rails to Node.js and the number of servers needed went from 30 servers down to 3.
Node.js has popular web application frameworks, such as Express and Adonis. These two examples are very different from one another. Express is very unopinionated, meaning that it offers some tools and you can make sound or poor design choices with those tools. Adonis, on the other hand, is very opinionated, focusing on convention over configuration. It has adopted "best practices" and guides the programmer into following them precisely. Because of that, Adonis is easy to learn and you can achieve good results with limited understanding (e.g., the framework handles common security issues in the background). But, in JavaScript world, new frameworks appear weekly and old ones are abandoned. It would be a disservice for you to focus on any one framework before understanding the domain properly. And once you truly understand the domain, it is (somewhat) trivial to pick up new tools on the run.
Node.js runs on various platforms, for example, Windows, Linux, Unix, and macOS.
Installing Node.js
You can download an installer from Node.js website for Windows and macOS. If you are using Linux, you can use, for example, sudo apt-get install nodejs. These will install Node.js to your machine directly. The recommended version is currently 18, because the Plussa graders are based on version 18. Old linux versions will automatically install older Node.js versions. Remember to upgrade.
If you don't feel comfortable installing Node.js to your machine directly, you can also just install Vagrant and use Node.js in Vagrant. There is a Vagrantfile in the root of your cloned repo. Vagrant provides an all-contained Node.js environment and installs all the other tools, such as Mongo-DB, as well. The mounted directory is the way to exchange information from the prompt.
Video: installing and using Vagrant
In this video, I'll show you how to install and start using the Vagrant virtual machine included in the course assets.
Node Package Manager
Node.js in itself it quite compact. What makes it powerful is the rapidly growing ecosystem of third-party modules for it. This ecosystem is built around the npm module repository. While you can copy-paste or download source files and manually add them to your Node.js application, npm gives a simpler method: you can download modules with a single command. Npm can also be used to initialize new projects, define and run scripts (e.g., for compilation or testing), check for updated modules or discovered security vulnerabilities, etc.
Use npm init to create a new project. This will generate a package.json file, which can be used to keep track of all the required dependencies and to run scripts for, for example, starting and testing.
Use npm install to pull in external packages. For example, npm install lodash. The package.json will be updated with a new dependency, generating a list of all the packages that your project depends on. This allows you to specify also the versions of a package that your project can use using semantic versioning rules. This makes your build reproducible and thus easier to share with other developers. It also describes the exact node_modules tree, so you can reproduce it identically if needed.
What's the difference between npm and npx?
npm can be used to install packages locally, among other things. npx can be used execute some package without installing it locally. It is often used to run some scaffolding-creating scripts, such as npx create-react-app for React.js. The command will download the scaffolding script to a temporary location and execute it.
package-lock.json will be automatically generated when npm modifies node_modules or package.json.
You can find these external packages on the npm repo website with usually some usage instructions and other information. For example https://www.npmjs.com/package/node-fetch. The npm package repository is a huge library for all Node.js developers with hundreds of thousands of packages you can use to accelerate your application development.
Node.js servers
We'll use Node.js mainly for setting up servers.
Getting started and creating your very first simple server is deceivingly easy. Here's a sample index.js:
const http = require('http');

const hostname = 'localhost';  //or 127.0.0.1
const port = 3000;

const server = http.createServer((req, res) => {
    res.setHeader('Content-Type', 'text/plain');
    res.statusCode = 200;
    res.end('Hello World!\n');
});

server.listen(port, hostname, () => {
    console.log(`Server running at http://${hostname}:${port}/`);
});
You can start this server from the command prompt with the command node index.js. The server starts to listen for requests from clients. You can verify that it works by opening another terminal session and sending, for example, a curl request to it. This application will stay open waiting for the requests. You can terminate it by pressing Ctrl+C.
On the very first line, we require('http'); This is needed to use the HTTP server and client. Modules and packages are the building blocks for your application. A module encapsulates some functionality, hides implementation details and exposes an API for the module. An installed module is called a package. We can export functions and variables from one file and require them in another. This is an important part of organizing your code sensibly, so let's take a tiny de-tour here and write a super simple example. Let's create a new file called sample.js:
let count = 0;

exports.next = function() {
    return ++count;
};

exports.hello = function() {
    return "Hi";
};
We have now defined a variable count, which is not exported. Then we have two functions, which are exported, and in one of them, the value of count get's also exported. Now, to use this, we can boot up the Node.js REPL and require these functions:
$ node
> const s = require('./sample');
undefined
> s.hello();
'Hi'
> s.next();
1
> s.next();
2
> s.next();
3
> console.log(s.count);
undefined
Hope this seems simple because it will get a bit more complicated: there are two competing systems in place, the CommonJS modules and the ES6 modules. There are historical reasons for this confusion. In fact, it might be beneficial to know already at this point that there are many inconsistencies like this due to the web moving so fast and new ideas coming and going all the time. If you are not on top of your game with JavaScript for a few years, you will have a lot of catching up to do. It can be tiring, but also very exciting!
But back to the server example. After require we declare the hostname and port. Since I don't intend on changing these values, and since I don't want others to change them either, I have declared them as const. There are other declarations also:
| Declaration | Description |
|---|---|
var |
Declares a variable, optionally initializing it to a value. |
let |
Declares a block scope level variable, optionally initializing it to a value. |
const |
Declares a read-only named constant. |
... but we'll go over the differences between those later in the material.
Then we proceed to create the server with the const server = http.createServer((request, response) => {...});. The createServer() method accepts a callback function that gets two arguments, a request and a response. All of HTTP transactions revolve around requests and responses. We'll cover them in the next chapter, but in a simplified example you make a request when you enter an URL in the browsers address bar and you receive a response when you see that web page. In our code, the request object has information about the request (e.g., the URL, meta information about the client, etc.) and the response object you need to populate with the information you wish to send back to the client. Sometimes it will be a web page, but in this example it is a simple string of text.
A callback function is a function passed into another function as an argument, which is then invoked inside the outer function to complete some kind of routine or action.
| Extra: Mozilla Developer Network - Callback function.
In this example, it is written as an arrow function expression. An arrow function expression has shorter syntax than a function expression and does not have its own this, arguments, super, or new.target. These function expressions are best suited for non-method functions and they cannot be used as constructors. But we'll go over what these mean in more detail later.
/* function expression */
const server = http.createServer(function (req, res) { /* ... */ });

/* arrow function expression */
const server = http.createServer((req, res) => { /* ... */ });
| Extra: Mozilla Developer Network - Arrow function
The callback function is called every time a client makes a request to the server. It takes two parameters: a request and a response.
You can think of the request as an "input" type of a parameter and the response as an "output" type of a parameter. The response gets populated with a status code, a content-type header, and the payload in body:
res.setHeader('Content-Type', 'text/plain');
res.statusCode = 200;
res.end('Hello World!\n');
The status code that will be sent to the client when the headers get flushed is 200 OK.
end() finishes sending the response. If any part of the body is unset, it will flush them to the stream.
Note that a response will be sent only if a request is received. Without requests, this server will silently sit waiting. If you want, you can add inside the createServer curly braces some logging to see when a request has been received:
const server = http.createServer((req, res) => {

    console.log("Whoo! We have made contact with a client!");

    res.setHeader('Content-Type', 'text/plain');
    res.statusCode = 200;
    res.end('Hello World!\n');
});
By now you have surely spotted that console.log() is a handy way of printing debug data. So, this might be a good place to mention some details about it.
- Use it A LOT. Sure, there are debugging tools and sure, you can place brakepoints in the browser developer tools, but a lot of developers I've seen write JavaScript still default to
console.log()in many cases.- Of course, there is a downside to this: a large codebase littered with console.log's is not ready to ship to the clients: users can see those logs and that can open attack vectors for malicious users.
- Many developers use build tools, and as a part of that process a very verbose library can be turned into a minified black box. This also helps with download times.
- In Node.js, console.log's appear on the terminal screen, in the brosers the console.log's appear in the browser developer tools' console.
- You can log variable values with
console.log("myVar=" + myVar), but this concatenation does not work well with objects, resulting inmyVar=[Object object]. Instead, use comma separation:console.log("myVar=", myVar). You should always use the comma separation, I seem to be too old to learn to do it that way and will most likely use concatenation throughout this material..
Since you should use console.log() so often, it might be beneficial to turn it into a snippet for your editor. For example, in Visual Studio Code, open File > Preferences > User Snippets, select JavaScript and insert the following:
{
    "console.log": {
        "prefix": "cl", // type cl+tab to expand to console.log (change this to suit you)
        "body": [
            "console.log('$1');", // insert cursor jumps to $1 automatically
        ],
        "description": "Expand to console.log()"
    }
}
Testing a Node.js server
Browsers are the common tools we use to ask for data from servers. One thing to keep in mind, however, is that browsers, by default, try to access port 80. We set the server to listen on port 3000 and must therefore instruct the browser to use that port. Write the URL as localhost:PORT. This makes the browser perform a GET request to a server that runs locally. This means that the browser is the client.
Browsers offer tools to inspect code and network traffic. At least for Google Chrome, the shortcut to access the developer tools is Ctrl+Shift+C. Also in the developer tools is console, where JavaScript commands can be executed just like in Node prompt.
| Extra: Tutorial of Google Chrome Dev Tools
Curl is an open-source software used to transfer data in command lines or scripts. It is the internet transfer backbone in thousands of internet applications. Curl is a command line tool and library for transferring data with URLs. The most simple example is a GET request:
curl 127.0.0.1:3000
You can also post data with a POST request:
curl -i -X POST localhost:3000/echo -d "abc"
Postman is an API testing tool for making HTTP requests that started out as a Google Chrome extension. You might think of it as a GUI for Curl. Learn more about Postman and get it from https://www.getpostman.com/.
wget is a non-interactive command-line tool, which can also easily be called from scripts. Here, we have a local server running in port 3000 serving a file called index.html:
> wget localhost:3000
--2020-08-02 17:46:03--  http://localhost:3000/
Resolving localhost (localhost)... ::1, 127.0.0.1
Connecting to localhost (localhost)|::1|:3000... connected.
HTTP request sent, awaiting response... 200 OK
Length: 7
Saving to: ‘index.html’

index.html                                         100%[==============================================================================================================>]       7  --.-KB/s    in 0s

2020-08-02 17:46:03 (902 KB/s) - ‘index.html’ saved [7/7]
wget can also be used recursively, that is, to retrieve the whole directory tree:
wget --recursive --no-parent SITE
Video: Basic debugging inside Vargrant
In this video, I'll show you how to run a simple Node.js server inside Vagrant, how to make requests to that server from the host OS command line and browser, and how to print debug info to the console.
Why we virtualize?
Installing all the tools on your own machine is a perfectly valid approach. And if you have a dedicated development machine, you probably want to install at least some of the most often used tools directly on it. However, some tools don't necessarily play well together and even if they do, you are usually stuck with just one version of the tool installed on your machine at one time. What if your boss asks you to test the code with a different database system version? Uninstall one and install another? Further, web servers are often Linux servers. Your OS of choice might differ. Virtualization allows us to develop and test our code in an environment closely resembling the production environment, even if that is not our daily driver.
One solution to virtualization is installing, for example, Ubuntu Linux using, for example, Oracle's VirtualBox.
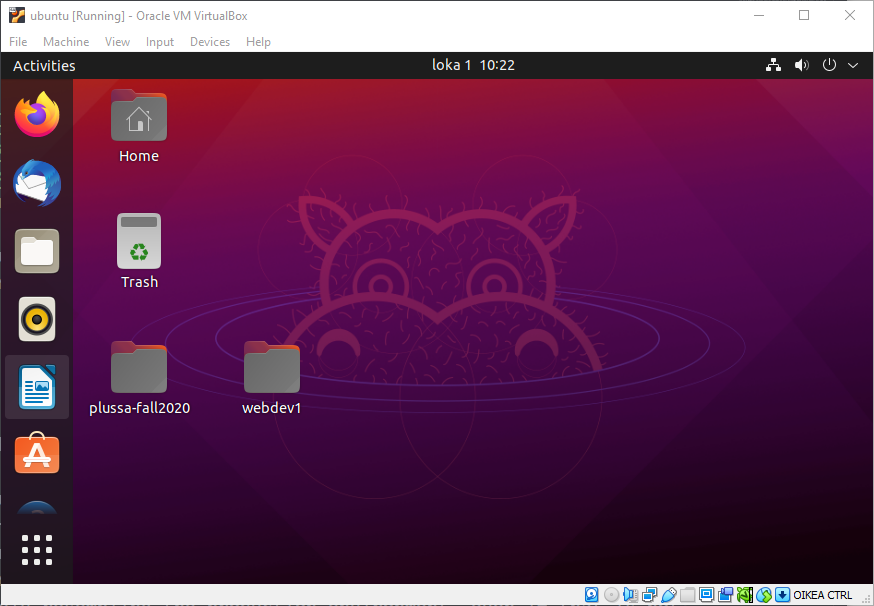
You can boot it up with one click when you need it and bring it down when you don't. This might be the easiest way to run a virtual environment, but there is a performance penalty associated since the host machine needs to share resources for two OS' at the same time. Also, it can take some settings tweaks to get, for example, the graphics driver settings optimal.
You can have many virtual machines running at the same time, so you can test your code on many different environments at the same time. But installing and configuring entire virtual machines is still a lot of work if you have to do it multiple times. Let's say you need to test your code against another database service version. Do you then install a whole new virtual machine configuring it to match the other with only the database system version changing? Sounds like a lot of work. Further, do you really need the full desktop environment for just testing your code?
You can think of Vagrant as a layer on top of virtualization software, such as Oracle's VirtualBox. The benefit of Vagrant boxes is that they can be described using a Vagrantfile. You can write the desired features, such as OS version, IP address, port-forwarding, shared folders, as well as what software you want to be installed in text. Then, you can provision the machine and have it configured and your tools installed automatically. After this, creating another copy with a different database system version is a breeze.
Vagrant machines typically do not install a desktop, the graphical part, but are used from the command line. This makes them more lightweight than full virtual machines. But you do not need a GUI. You install and configure using the Vagrantfile or command-line tools and you typically use the development tools of your host OS. The shared folder allows you to, for example, write code in Windows and execute it in Linux.
Vagrant is a good option for the development of monolithic web applications. You can make the virtual environment similar to the production environment, which reduces the risk of issues arising in production. Yet, you still have to maintain both the virtual machine for development as well as the server for production. To remedy this issue, another virtualization technique was created: Docker. Docker splits the services of your application (such as Node.js, MongoDB, etc.) to their own separate light-weight virtual containers. If you want to test your code against, for example, four different versions of MongoDB, creating four containers with just MongoDB in them is even more simple, than the Vagrant approach. Further, since the containers run inside Docker, that is there is a layer of virtualization between the containers and the host OS, you can push the containers to production and not need to do so much server maintenance work.
Since Docker splits your services into separete containers, your application may consist of many containers. Creating all of them by hand is too much work, so a tool called Docker compose was created, with which you can once again use a configuration file to define the required containers, shared folders (called virtual volumes), exposed ports, etc.
Even a step further in the virtualization path is container orchestration. Microservice architectural patterns can lead to the need of very many containers, and one of the biggest arguments for microservices is their easier scalability. Another tool, like Kubernetes, is needed to orchestrate a ton of containers.
Hopefully, I've managed to bring out that these tools have been created to satisfy a need. You can write just as good code on your own machine as you can using all the fancy virtualization tools. For the scope of this course, Vagrant is a good choice. But so is not using any virtualization, it's up to you to decide. Docker and the rest will be introduced properly on other courses, but even then it is important to remember, that they are tools to help you with specific issues. It is important to be aware of them and what they hope to accomplish, but if you do not need them right now, don't worry too much about them.
Other tools
Nodemon will watch the files in the directory in which nodemon was started. If any of the files change, nodemon will automatically restart your node application.
Mocha is a feature-rich JavaScript test framework running on Node.js and in the browser, making asynchronous testing simple and fun. Mocha tests run serially, allowing for flexible and accurate reporting while mapping uncaught exceptions to the correct test cases.
/* the function to test... */
function sum(...arguments) {
    return arguments.reduce((prev, curr) => {
        return prev + curr;
    });
}

/* ...and the test function */
it('should add numbers', function() {
    expect(sum(1, 2, 3, 4)).to.equal(10);
});
Testing is an important topic, but we have a dedicated course for that.
CI/CD pipeline enables delivering and deploying code changes more frequently and reliably. CI is short for continuous integration, CD for continuous delivery. While these are important topics, we have to limit the extent of this course. But to whet your appetite, think of pushing changes to a repo having it automatically run tests on the code, and - given the tests pass - update the code on the production server without the users even noticing. Then compare that with taking the whole site down for maintenance while frustrated customers look for other companies.
ESLint is an open-source JavaScript linting utility. Linting tools allow developers to discover problems with their JavaScript code without executing it. Further, these tools can reformat your code to comply with desired style guides. Tabs vs. spaces? Why should you be made to choose?
SonarQube can be used for debugging code. It also warns about security issues in your code. SonarQube covers multiple languages, so it is not JavaScript specific, like the ESLint.
There are many more tools. New ones appear frequently, and old ones fade away. Do not get too invested in one particular tool but try to understand the need behind it. The sad fact is that you will have to learn a lot of new tricks and tools and unlearn old habits if you want to work on the web.
Summary
In this chapter, we have taken a look at some of the tools of a modern web developer. We have also opened the door into virtualization. All tools (even virtualization) should make your life as a developer easier. They should fix some problems. If that is not the case for you, the need for the tool should be questioned. Having said that, it might seem pointless right now to set up Vagrant and easier to just install Node.js locally, but once we start accessing databases from Node.js, it will be nice to have those pre-configured as a Vagrant box.
We discussed also the differences between websites and web applications. With websites, if we have an endpoint http://example.com/about.html, there will be a file called about.html on that server. With web applications, if we have an endpoint http://example.com/about, there will most likely be some front controller that accepts the request, parses it as method=GET, uri=about, routes that request to some controller, that returns some view that will most likely have some dynamic content in it (hence, it is server-rendered). But a web application might also move logic on the client and offer only a REST API from which the client asks for JSON data.
Ask yourself
- Why do we use version control systems?
- What are the similarities between JavaScript in a browser and in Node.js?
- And how do they differ?
- Why is it a bad idea to install all developer tools locally?