5. JavaScript
JavaScript, or JS for short, is a widely popular programming language, not least because it is the language for the web. Although it might look a bit like C and has Java in its name, it is a very different language from those.
| Extra: The World's Most Misunderstood Programming Language
So, JavaScript is the programming language of the web. The overwhelming majority of websites use JavaScript, at least to some extent. All modern web browsers - whether on desktops, tablets, or mobile devices - include JavaScript interpreters. This makes JavaScript the most-deployed programming language in history.
JavaScript versions
In the beginning, JavaScript was used for annoying pop-ups and other mischievous activities. This led some developers to deeply hate the language. Script kiddies copy-pasted code snippets they didn't understand from Stack Overflow, which generally rarely improved the user experience. But the web needed a client-side programming language. Java Applets were tried starting from Java 1 in 1995, but they relied on users installing Java runtimes to their machines. Oracle announced in January 2016 that Applets would be deprecated in Java SE 9, and the technology was removed in Java SE 11. It was really easy to get started writing JavaScript, and with the lack of competing languages, JavaScript had time to evolve. Today, JavaScript is a high-level, dynamic, interpreted programming language that is well-suited to object-oriented and functional programming styles.
The variables in JavaScript are untyped. The syntax is loosely based on Java, but other than that, the two languages are unrelated. On that note, the name JavaScript is highly misleading: Except for the superficial syntactic resemblance with Java, JavaScript is completely different. And it has long since outgrown its scripting-language roots to become a robust and efficient general-purpose language suitable for serious software engineering and projects with huge codebases.
JavaScript: Names, Versions, and Modes
JavaScript was created at Netscape in the early days of the web and technically is a trademark. It was standardized by the European Computer Manufacturer's Association. So, the name is actually ECMAScript. This name, however, is in practice only used to refer to versions of the standard. Version 5 of the ECMAScript - or ES5 for short - has been supported by all web browsers for most of the 2010s.
Version 6 of the ECMAScript - or ES6 for short - was released in 2015 and added major new features, such as class and module syntax. This transformed JavaScript from a scripting language into a serious general-purpose language suitable for large-scale software projects.
Since ES6, the ECMAScript specification has moved to a yearly release cadence, and versions of the language - ES2016, ES2017, ES2018, ES2019, and ES2020 - are now identified by the year of release.
As JavaScript evolved, the language designers attempted to correct flaws in the early - as in pre-ES5 - versions. In order to maintain backward compatibility, it is not possible to remove legacy features, no matter how flawed. This lead to the creation of JavaScript's strict mode in which a number of early language mistakes have been corrected. In ES6 and later, the use of new language features often implicitly invokes strict mode.
JavaScript is an implementation of ECMAScript, specified in standard ECMA-262. The first specification of ECMAScript was published in 1997 and the 11th edition, ECMAScript 2020, was published in June 2020. In this course, we will be using ECMAScript 2015 which is also called ES6 (as it is the 6th edition of the standard). Browser support for the ES6 is almost finished, but it is still lacking a bit. ES5 is still recommended for production code. You can, however, use ES6 for development and then use a tool to transpile the code down to ES5. Then, you will have one code-base in ES6 for development and an automatically generated copy in ES5 for putting on the server.
You might be wondering about the possible differences between the JavaScript we've been running using Node.js and the JavaScript we'll be running in the browser. They are the same language, and the differences lay in some more practical matters. In the browser context, all the code shares a common namespace by default. The input and output are also different. In Node.js you can accept command-line arguments, you can read files from the filesystem, you can output directly on the screen using console.log(). In the browser, your main source of input comes from the DOM that we covered in chapter 3. You will be mostly working with data the user inputs using <input> elements, and for output, you will most often need to generate DOM nodes and inject them onto the DOM tree.
If we are running a Node.js backend and some JavaScript in the frontend, how can we know which .js file is for the backend and which is for the frontend? Well, you could put them in separate folders to avoid confusion. But one general trick is that if the file begins with const xx = require('./xx');, it is most likely part of the Node.js backend, as many frontend coders use the ES6 style import of import { x, y } from './xyz';.
On that note, while ES6 supports the use of modules in the browser with a special script tag, most frontend code is compiled into a single JavaScript file during the "build" process. This "build" process often includes also transpiling ES6 to ES5, removing developer comments, and minifying the code by removing whitespace and shortening function and variable names.
Video: Transpiling ES6 to ES5 with Babel
In this video, I will show you how to install, configure, and use Babel to turn your ES6 code into ES5.
JavaScript as a programming language
JavaScript is a prototype-based, multiparadigm, and dynamically typed programming language, in which functions are first-class citizens. Those are some of the interesting parts, but JavaScript covers the usual data types, etc., also.
Mozilla Developer Network has a great tutorial on JavaScript.
For a thorough look at the history and features of JavaScript, you can watch Douglas Crockford's series on JavaScript.
| Volume | Description |
|---|---|
| Volume 1 | focuses on programming languages and developments before JavaScript |
| Volume 2 | concentrates on JavaScript as a programming language |
As a language, JavaScript combines multiple paradigms: imperative and declarative programming, object-oriented programming is possible, as well as functional-oriented programming.
The more puritan followers of any programming paradigm will argue that JavaScript doesn't do ${PARADIGM} right, as it was not designed from the ground up to support it. They are right to a certain degree. But JavaScript does offer ways for implementing code in a reasonably sensible manner using many paradigms.
For more information about how different paradigms can be used with JavaScript, see for example What Are JavaScript Programming Paradigms?
How to load code
We are mainly interested in running JavaScript in browsers and Node.js. For running JavaScript in browsers, there are two ways for adding JavaScript files to your HTML page:
- External file
- Inside
script-element
Generally, it is a good idea to move as much as you can of the script to external files.
<!-- from external file -->
<script src="my_script.js"></script>

<!-- inside script-element -->
<script>
    console.log("Hello console");
    alert("Alert");
</script>
Types, variables, functions
Types
Mozilla Developer Network lists the JavaScript data types and data structures as defined by the latest ECMAScript standard.
Primitive types in JavaScript are immutable. This means that their values can not be changed after you have created them. Instead, behind the scenes, the values get copied to another location in memory. They are:
| Primitive type | Acceptable values |
|---|---|
String |
e.g., 'Hello', 'Hi' |
Number |
e.g., 7, 3.14, 7.5e1 |
BigInt |
e.g., 53n, in ES2020 |
Boolean |
true and false |
Undefined |
e.g., no value has been set |
Symbol |
see Symbol, in ES2015 |
There's also the regular expression pattern, such as /[a-zA-Z].+/. Notice that this is not a string and therefore is not surrounded with any kind of quotation marks.
Structural types are Object and Function. An Object is a data type that is a collection of properties (key/Symbol-value pairs) and is mutable. An Object is the prototype to several other types, including Array (also Map, Set, WeakMap, and WeakSet from ES6).
null is a Structural Root Primitive.
"There also is null, which is seemingly primitive, but indeed is a special case for every Object: and any structured type is derived from null by the Prototype Chain" From Primitive entry in Mozilla Developer Network Glossary
JavaScript provides a set of standard built-in objects, which include objects for all the data types except undefined and null. Many of these objects provide utility methods useful for data manipulation. For example, Math, Date, and RegExp:
// random number between 0 and 1 [0,1)
let seed = Math.random();

let lottoNr = Math.floor(1 + 40 * seed);

// year, month, day, hour, and minute
const start_date = new Date(2019, 4, 4, 14, 15);

let today = new Date();

// month = e.g., 9
const month = today.getMonth();

// returns the first match
const pattern = /[0-9]/;
let found = str.match(patt);
All of the primitive types, except for undefined, have corresponding JavaScript wrapper objects. Wrappers provide means for using primitives as if they were the corresponding objects with access to all its methods. For example:
let primitive = "I am a string";
typeof primitive; // prints 'string'
primitive.toUpperCase(); // prints 'I AM A STRING'

// or
'hello'.toUpperCase(); // prints 'HELLO'
Variables
As we have discussed earlier, variables in JavaScript are declared with var, let, or const keyword:
| Declaration | Description |
|---|---|
var |
Declares a variable, optionally initializing it to a value. |
let |
Declares a block scope level variable, optionally initializing it to a value. |
const |
Declares a read-only named constant. |
And as was said at the beginning of this chapter, JavaScript is dynamically typed. When assigning a value to a variable, the type of the variable will be dynamically assigned by the JavaScript interpreter during runtime. Assigning the same variable a new value of a different type will change the type of the variable. As long as a variable's value is not set, its value will be undefined.
So, in Java you might write, for example int a = 3; // a is Integer. In JavaScript you can write let a = 3; // a is Integer.
Let's compare Java and JavaScript a bit. First, some examples in Java:
int a = 3;
// a = 3.
// a is Integer because you used the keyword int

a = "fuu";
// error.
// You said that a is int and now you try to set the value to String.
// This is not OK.

int b = "bar";
// error.
// You declared b as int and now try to set the value to String.
// This is not OK.

int c;
// c = Integer.
// This is OK as long as you don't try to print out the value of c.
and then similar variable assignments in JavaScript:
let a = 3;
// a = 3.
// a is Number, because you gave it an integer value

a = "fuu"
// a = "fuu".
// a used to be Number, but since you gave it a String value, it is now String

let c;
// c = undefined.
// c will remain undefined until you give it some other value
In JavaScript it is also possible to declare variables without var, let, or const by simply writing, for example d = false;. This will declare the variable in global scope. This means, that the variable is accessible by any script on the page and will overwrite any existing variable of the same name in the global scope. This can break other pieces of code that otherwise work perfectly and therefore those bugs can be tremendously difficult to find.
Warning
Always use either var, let, or const when declaring variables. Not doing so will eventually harm you and your users.
Examine this code sample
Examine this code sample, place your attention on the variables.
If you do not spot the issue, you may also run this code in Node.js to examine its behavior.
function addTenStupid(num) {
    for(i = 0; i < 10; i++) {
        num += 1;
        console.log(`addTenStupid: i ${i} num ${num}`);
    }

    return num;
}

function addThousandStupid(num) {
    for(i = 0; i < 100; i++) {
        num += addTenStupid(0);
        console.log(`addThousandStupid: i ${i} num ${num}`);
    }

    return num;
}

console.log(addTenStupid(0)); //will produce 10
console.log(addTenStupid(5)); //will produce 15
console.log(addThousandStupid(1)); //Can you guess what will happen?
So, why did it behave the way it did? See if you can spot wherein the code a variable is declared in the global scope as discussed above.
Scoping
Any variable declared with var has a function scope. var declared inside a function will be visible in that whole function and any inner functions. Any variable declared inside a block will be visible everywhere within the function that holds the block.
function foo(x) {

    var xPlusOne = x + 1;

    function bar(y) {
        console.log(x);
        console.log(xPlusOne);
        console.log(y);
    }

    bar(xPlusOne + x);
}

foo(7); //Will result in printing 7, 8, and 15
let and const have a block scope, enabling tighter control of visibility of the variable. They were introduced in ECMAScript 6. See let and const for more information.
| Extra: Mozilla Developer Network - let
| Extra: Mozilla Developer Network - const
OK, so we have var, let, and const. Why might you want to use each? Well, a general rule might be, that it is often good to avoid using var alltogether because of how it behaves in relation to scopes. And what does that mean? Well, let's look at an example.
var i = 'Hello, there!'; // we are in global scope

for(var i = 0; i < 5; i++) { // we are inside of a scope
    console.log(`Iteration ${i}`);
}

console.log(i); // Prints: 5.

// Even though the variable i was declared inside of the for loop,
// it has found its way into the global scope and has silently overwritten
// the original value. This kind of unexpected change in variable value
// can lead to difficult-to-track bugs in your code.
i to be the string Hello, there!, but somewhere later in our code, its value changes to an integer possibly causing bugs. Let's see how the same coude would behave had we used let instead.
let i = 'Hello, there!'; // we are in global scope

for(let i = 0; i < 5; i++) { // we are inside of a scope
    console.log(`Iteration ${i}`);
}

console.log(i); // Prints: Hello, there!
So, hopefully you now see why using a var might be a bad idea in some cases and how let might often be the better alternative with little negative consequences. And for const? Well, that's just a constant value, something that is not supposed to be changed. It can be used for extra assurange, that some important value cannot be re-assigned by mistake. For example:
const URL = 'http://api.my-app.test/v1/';

URL = 'Hello, there!'; // Uncaught TypeError: Assignment to constant variable

console.log(URL); // Prints: http://api.my-app.test/v1/
New keywords are sometimes introduced
There are other, more specific keywords being suggested for the language, but it might take time for them to become mainstream, if ever. One interesting proposal, especially for back-end use, is the using keyword. This can be especially interesting when dealing with files. If you open a file for writing in Node.js, you must remember to close it also. Otherwise, it will remain locked and other code cannot access it. But if you use the using keyword, then when the file is no longer in scope, meaning that you no longer have access to this variable and it has been cleaned up by the garbage collector, JavaScript will automatically take care of closing that file for you.
One more reason to avoid the global scope (and the var keyword, that can in some cases "leak" into the global scope) is that there is no protection against overwriting built-in functions. By now you most likely are aware of the alert() function available in the client-side JavaScript. Calling alert() will trigger a alert box in the browser. But alert is also quite common word that you might want to use as your own variable name. Let's look at a code snippet to see the danger here:
alert("Something bad is about to happen!"); // Triggers an alert box in the browser

let alert = "Mind the gap!"; // Perfectly valid statement

alert("Something bad has happened!"); // Uncaught TypeError: alert is not a function
console.log() commands from printing to the console into writing to a log file, for example. But, with this much power, comes great responsibility.
JavaScript pitfalls
Some language choices in JS have been unfortunate, such as defaulting to global and automatic semicolon insertion (ASI).
ASI, or Automatic Semicolon Insertion, inserts missing semicolons. It was meant to help novice developers, but as you might guess, such well-meaning endeavors rarely end well. Think about it, the interpreter changes your code behind the scenes into something it thinks that you intended to write. To avoid possible issues caused by this, let's agree, that you should always insert a semicolon at the end of statements in your code.
| Extra: How ASI works
Similarly, as discussed before, the use of global namespace by default can lead to hard-to-detect problems. You should always use either var, let, or const when declaring variables.
But there's one special kind of pitfall in JavaScript, that probably everyone has struggled with in the beginning. The infamous this keyword.
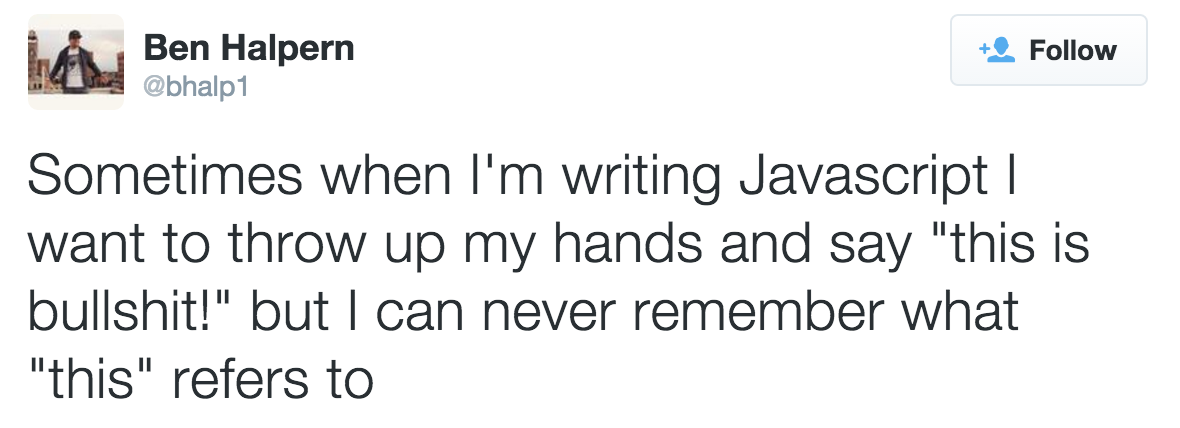
this is a keyword that refers to the current execution context. When it is used in the global scope, it refers to the global object. Inside functions, it behaves differently depending on whether the strict mode is used. Inside a method, it refers to the object on which it is called.
A good overview of what this can refer to can be read on the Mozilla Developer Network website.
| Extra: Mozilla Developer Network - this
Arrays
Arrays might just be the most important thing in JavaScript programming and for that reason this section is much longer than the others. But don't worry, most of the content length comes from the number of code examples 
"Arrays are list-like objects whose prototype has methods to perform traversal and mutation operations. Neither the length of a JavaScript array nor the types of its elements are fixed." Mozilla Developer Network - arrays
An array is a common data structure in most programming languages and should be familiar to you already. In JavaScript, as in many other languages, you access the contents with an index that starts from zero. So, the array is zero-based. They have a length property that is equal to the last index of the array + 1.
Here's some quick examples of arrays in JavaScript. They should look somewhat familiar:
// initializing an array, for empty array just use []
let someNumbers = [0, 1, 3, 9];
console.log(someNumbers.length); // prints 4
console.log(someNumbers[2]);     // prints 3

// .push adds to the end of array
someNumbers.push(12); // someNumbers is now [0, 1, 3, 9, 12]

// we can do even this:
someNumbers[7] = 99; // [0, 1, 3, 6, 12, undefined, undefined, 99]
someNumbers.length; // 8
There is one important thing to be aware of related to the Array's length property: you may also assign values to that property. Here's how that works:
let arr = [0, 1, 2, 3];
console.log(arr.length); // prints 4
arr.length = 2; // arr: [0, 1]
arr.length = 0; // arr: []
arr.length = 3; // arr: [empty * 3], same as new Array(3)
There are also other, less used features, such as these:
Array.of(); // []
Array.of(10); // [10]
Array.of(1, 2, 3); // [1, 2, 3]

let arr = [1, 2];
let copy = Array.from(arr);
console.log(copy); // prints [1, 2]
Perhaps you won't need these often, but you might encounter them in other peoples code.
Strings can be used as if they were arrays of characters, like this:
let s = "test";
console.log(s.charAt(0)); // prints "t"
console.log(s[1]); // prints "e"
Strings and Arrays should be very familiar to you from previous programming courses, so I trust it is enough here to present some examples without much extra explanations:
const str = ["H", "e", "l", "l", "o", " ", "w", "o", "r", "l", "d"];

let everyOther = "";
for(let [index, letter] of str.entries()) {
    if(index % 2 === 0) everyOther += letter;
}

console.log(everyOther); // prints "Hlowrd"

let uppercase = "";
str.forEach(letter => {
    uppercase += letter.toUpperCase();
});

console.log(uppercase); // prints "HELLO WORLD"

let vowels = "";
for(let i = 0; i < str.length; i++) {
    let letter = str[i];
    if(/[aeiou]/.test(letter)) {
        vowels += letter;
    }
}

console.log(vowels); // prints "eoo"

let asString = str.join(); // => "Hello world"
let another = str.join("-"); // => "H-e-l-l-o- -w-o-r-l-d"
Sometimes you might need multidimensional arrays also. Unfortunately, JavaScript does not support true multidimensional arrays, but luckily you can approximate them with arrays of arrays:
// Create a new empty array of arrays
let mat = new Array(10);
for(let i = 0; i < mat.length; i++) {
    mat[i] = new Array(10);
}

// Initialize the array
for(let row = 0; row < mat.length; row++)  {
    for(let col = 0; col < mat[row].length; col++) {
        mat[row][col] = row * col; // Assign some value for demonstration
    }
}

// Usage of multidimensional array to compute 5 * 7
console.log(`5 * 7 = ${mat[5][7]}`);
Arrays in JavaScript have several built-in functions very suitable for functional programming style. forEach(), map(), filter(), and reduce() can be used to replace normal for-loops.
The most self-explanatory is forEach():
[
    "Six fat sausages",
    "Four fat sausages",
    "Two fat sausages"
].forEach(verse => console.log(verse + ", sizzling in a pan, one went pop and the other went bang!"));

// prints:
// Six fat sausages, sizzling in a pan, one went pop and the other went bang!
// Four fat sausages, sizzling in a pan, one went pop and the other went bang!
// Two fat sausages, sizzling in a pan, one went pop and the other went bang!
map() is a short way of writing a for loop to go over elements in an array. map() also goes over the array, but a callback function is called for each element of the array. A new array is constructed from the return values of that callback function. The constructed array should be of the same length as the calling array - returning less or a different number of elements than in the original array is considered an anti-pattern.
[
    "span",
    "div",
    "br",
    "hr"
].map((element) => {
    return '<' + element + '>';
}).forEach(tag => console.log(tag));

// prints:
// <span>
// <div>
// <br>
// <hr>
There's a lot happening in the above code, so let's break it down a bit. We can start reading the code from the top left. We define an anonymous array with four HTML elements. We call map() on that array and every element is fed to the anonymous callback function, which pads the element with angle brackets. These values form a new array - the original array will remain untouched. forEach() is then called on the new array, which is identical to the previous example. Now, a few notes: map() will not change the original array, but return a new array. So, if we would have been interested to store the results, we would have had to write it like this:
let tags = [
    "span",
    "div",
    "br",
    "hr"
].map((element) => {
    return '<' + element + '>';
});

// tags = ['<span>', '<div>', '<br>', '<hr>']
We can even shorten this further by turning the map() into a one-liner and using the implicit return:
let tags = [
    "span",
    "div",
    "br",
    "hr"
].map(element => '<' + element + '>');

// tags = ['<span>', '<div>', '<br>', '<hr>']
But notice, that now we could not add the forEach() in the end. In the example, we called console.log(tag) in the callback. This does not return anything, hence the array would have remained empty:
let tags = [
    "span",
    "div",
    "br",
    "hr"
].map(element => '<' + element + '>'
).forEach(tag => console.log(tag)); // I don't return anything

// tags = undefined

// prints:
// <span>
// <div>
// <br>
// <hr>
Another good use for Array.map() is plucking values from JSON. Let's whip up some data and pluck values with for loop and map():
const students = [
    {
        "name": "Teemu Teekkari",
        "studentId": "tuni12345",
        "email": "teemu.teekkari@tuni.fi"
    },
    {
        "name": "Terhi Testaaja",
        "studentId": "tuni23456",
        "email": "terhi.testaaja@tuni.fi"
    },
    {
        "name": "Jaakko Javascript",
        "studentId": "tuni34567",
        "email": "jaakko.javascript@tuni.fi"
    }
];

// for loop takes all these lines
let studentNames = [];

for (let i = 0; i < students.length; i++) {
    studentNames.push(students[i].name);
}

console.log(studentNames);

// but map() is quite succinct
const studentNames2 = students.map(std => std.name);
Array.filter() works in a similar way as Array.map() in that a callback function is called for each element in the array and a new array is constructed as a result. The difference is that the callback function must return true to keep the element in the new array, or false to discard the element from the new array.
let smallNumbers = [1, 3, 5, 7, 9].filter(num => 5 >= num);

// smallNumbers = [1, 3, 5]
Let's try filter with the student's array:
const students = [
    {
        "name": "Teemu Teekkari",
        "studentId": "tuni12345",
        "email": "teemu.teekkari@tuni.fi",
        "major": "pervasive computing"
    },
    {
        "name": "Terhi Testaaja",
        "studentId": "tuni23456",
        "email": "terhi.testaaja@tuni.fi",
        "major": "pervasive computing"
    },
    {
        "name": "Jaakko Javascript",
        "studentId": "tuni34567",
        "email": "jaakko.javascript@tuni.fi",
        "major": "mathematics"
    }
];

const MAJOR = "pervasive computing";

// here's the old-fashioned for-loop approach
let pervasiveMajors = [];

for (let i = 0; i < students.length; i++) {
    if(students[i].major === MAJOR) {
        pervasiveMajors.push(students[i]);
    }
}

// and here's the filter()
const pervasiveMajors2 = students.filter(std => std.major === MAJOR);
reduce() is a bit different. It is used to reduce an array of values into a single value. This is often sum, average, or similar. Once again a callback function is called for each element in an array. But this time an accumulator value is used to accumulate the returned values (IntelliSense code hint uses the term prev to refer to the accumulator):
[1, 2, 3].reduce((prev, curr) => prev + curr); // 6

// i.e., +1=1, 1+2=3, 3+3=6
Here's the form the function can take:
arr.reduce(callback(accumulator, currentValue[, index[, array]])[, initialValue])
This initialValue, while optional, is mandatory for an array of objects. For example:
const shoppingCart = [
    {
        "name": "toothbrush",
        "category": "hygiene",
        "price": 2.99
    },
    {
        "name": "offBrandCoke",
        "category": "foodAndDrinks",
        "price": 0.99
    },
    {
        "name": "offBrandHamburger",
        "category": "foodAndDrinks",
        "price": 1.49
    },
    {
        "name": "offBrandFries",
        "category": "foodAndDrinks",
        "price": 1.49
    }
];

// for-loop style
let total = 0;

for (let i = 0; i < shoppingCart.length; i++) {
    total = total + shoppingCart[i].price;
}

// reduce() style
const total2 = shoppingCart.reduce((sum, item) => sum + item.price, 0)
To take the last example even further, we can reduce the sums by category:
const categories = ["hygiene", "foodAndDrinks"];

const pricesByCategory = categories.map(category =>
    shoppingCart.filter(item => item.category === category)
        .reduce((priceObject, item) => {
            priceObject[item.category] =
                (priceObject[item.category] || 0) + item.price;
            return priceObject;
        }, Object.create({ "category": null })));

console.log(pricesByCategory);
// [ { hygiene: 2.99 }, { foodAndDrinks: 3.96 } ]
There are still some more Array methods that are often needed, but I feel are so self-explanatory, that usage examples might suffice. Of course, you can easily find more infrmation about these online.
let a = [1, 2, 3, 4, 5];

// find() and findIndex()
a.findIndex(x => x === 3) // => 2; the value 3 appears at index 2
a.findIndex(x => x < 0) // => -1; no negative numbers in the array
a.find(x => x % 5 === 0) // => 5; this is a multiple of 5
a.find(x => x % 7 === 0) // => undefined; no multiples of 7 in the array

// every() and some()
a.every(x => x < 10) // => true; all values are < 10
a.every(x => x % 2 === 0) // => false; not all values are even
a.some(x => x % 2 === 0) // => true; some numbers are even
a.some(isNaN) // => false; no non-numbers in the array
ES2019 brought the flat() method, which creates and returns a new array that contains the same elements as the array it is called on, but any elements that area arrays are "flattened":
[1, [2, 3]].flat() // => [1, 2, 3]
[1, [2, [3]]].flat() // => [1, 2, [3]], only flattens one level at a time
[1, [2, [3, [4]]]].flat(3) // => [1, 2, 3, 4], you can specify how many levels to flatten
concat() can be used to combine arrays with each other:
let a = [1, 2, 3];

a.concat(4, 5) // => [1, 2, 3, 4, 5]
a.concat([4, 5], [6, 7]) // => [1, 2, 3, 4, 5, 6, 7]; arrays are flattened
a.concat([4, [5, [6, 7]]]) // => [1, 2, 3, 4, 5, [6, 7]]; ...but not nestes arrays
// the original array is not modified
In JavaScript, Array also fills the roles of Stack and Queue:
let stack = []; // stack: []
stack.push(1, 2) // stack: [1, 2]
stack.pop() // stack: [1]; return 2
stack.push(3) // stack: [1, 3]
stack.pop() // stack: [1]; return 3
stack.push([4, 5]) // stack: [1, [4, 5]]
stack.pop() // stack: [1]; return [4, 5]
stack.pop() // stack: []; return 1

let queue = []; // queue: []
queue.push(1, 2) // queue: [1, 2]
queue.shift() // queue: [2]; return 1
queue.push(3) // queue: [2, 3]
queue.shift() // queue: [3]; return 2
queue.shift() // queue: []; return 3

// Note: when unshifting more than one element at a time,
// the insert order is not changed:
let a = []; // a: []
a.unshift(1) // a: [1]
a.unshift(2) // a: [2, 1]
a = []; // a: []
a.unshift(1, 2) // a: [1, 2]
Arrays can be divided into subarrays with slice() and splice():
let a = [1, 2, 3, 4, 5];
// slice() does not modify the original array
a.slice(0, 3) // return [1, 2, 3]; from index 0, up 3 indices
a.slice(3) // return [4, 5]; from index 3 until end
a.slice(1, -1) // return [2, 3, 4]; from index 1 until end -1
a.slice(-3, -2) // return [3]; from end -3 to end -2

let a = [1, 2, 3, 4, 5, 6, 7, 8];
// splice() modifies the original array
a.splice(4) // => [5, 6, 7, 8]; a is now [1, 2, 3, 4]
a.splice(1, 2) // => [2, 3]; a is now [1, 4]
a.splice(1, 1) // => [4]; a is now [1]
Values can be searched for using indexOf() and lastIndexOf():
let a = [0, 1, 2, 1, 0];
a.indexOf(1); // => 1: a[1] is 1
a.lastIndexOf(1); // => 3: a[3] is the last occurance of 1
a.indexOf(3); // => -1: no element has value 3

// Find all occurances of a value x in an array a
// and return an array of mathing indexes
function findAll(a, x) {
    let results = [],
        len = a.length,
        pos = 0;

    while(pos < len) {
        pos = a.indexOf(x, pos);
        if(pos === -1) break;
        results.push(pos);
        pos++;
    }

    return results;
}

// includes() (new in ES2016) replaces some need for indexOf checking
let a = [1, true, 3, NaN];
a.includes(true) // => true
a.includes(2) // => false
a.includes(NaN) // => true
a.indexOf(NaN) // => -1; indexOf can't find NaN
Arrays can be sorted using the sort() method:
let a = ["banana", "cherry", "apple"];
a.sort(); // => a: ["apple", "banana", "cherry"]

let a = [33, 4, 1111, 222];
a.sort(); // => a: [1111, 222, 33, 4]; alphabetical order

a.sort(function(a, b) {
    return a - b;
}); // => a: [4, 33, 222, 1111]; numerical order

a.sort((a, b) => b - a); // => a: [1111, 222, 3, 4]; reverse numerical order
Video: rest, spread, and reduce
Functions
In JavaScript functions are first-class citizens. This implies that they can be passed as parameters, returned as a value, or assigned to a variable. Once again, the Mozilla Developer Network website has great examples.
| Extra: Mozilla Developer Network - first-class function
A function is also an Object that has its own method functions, like call, bind, and apply.
| Extra: Mozilla Developer Network - function
Functions are defined with the function keyword and a name (optional) and parameters in parentheses (also optional) as a comma-separated list. Functions can be defined in the global scope and then invoked with the name of the function followed by parameters in parentheses. Functions can also be defined as methods of an object. In that case, the methods are invoked with dot notation (e.g., myObject.doSomething()).
Since ECMAScript 6 you can also set a default value for parameters. For example function warnUser(message, severeWarning = false) {}.
Of course, your functions may rely on other functions in order to do their job. For example:
function add(a, b) {
    return a + b;
}

function addOne(a) {
    return add(a, 1);
}

console.log(add(1, 3)); // 4
console.log(addOne(5)); // 6
You have seen many examples of declaring functions as named functions:
function sum(a, b) {
    return a + b;
}

sum(1, 2); // 3
You can also use anonymous functions, for example when assigning them to a variable:
let sum = function(a, b) {
    return a + b;
};

sum(1, 2); // 3
You'll most likely end up writing a lot of anonymous functions. Because of this, ES6 introduced the arrow function expression that provides a shorthand for declaring anonymous functions. For example, this function:
let greet = function() {
    console.log("Well, hello there!");
};
... can be shortened using the arrow function like this:
let greet = () => console.log("Well, hello there!");
This is more than the syntactic sugar of replacing the function keyword with the arrow: arrow functions are also lighter weight. This comes at the cost of changing the value of this (the reference to the context) inside the arrow function. In normal functions, this has a unique value inside the functions, while in arrow functions, this has the same value as the scope containing the arrow function. What this means is that, when using an arrow function expression, we do not have to jump through hoops to bring this into the callback function because this is the same at both levels of the code.
You may also accept arguments using the arrow function expression, as you would with traditional anonymous functions:
let sum = function(a, b) {
    return a + b;
};

let sum = (a, b) => a + b; // Notice how the 'return' is implicit
A few notes about arrow function expressions: If the function body consists of a single line, you may omit the curly braces. If you accept exactly one argument, you may omit the parenthesis around the argument. With more or less than one argument, you need the parenthesis. And finally, notice the implicit return shown in the above example.
// can omit parenthesis
let sayHello = message => console.log(message);

// can't omit the parenthesis, requires curly braces
let doManyThings = () => {
    console.log("**********");
    console.log("* Hello! *");
    console.log("**********");
};
As discussed before, JavaScript often uses functions as arguments for other functions. These are known as callback functions. While you can use named functions as callback functions, for example like this:
function hello() {
    // This executes later after 1 second.
    alert('Hello!1!');
}

setTimeout(hello, 1000);
... it is also common to use anonymous functions as arguments of other functions, like this:
setTimeout(function() {
    // This executes later after 1 second.
    alert('Hello!1!');
}, 1000);

// which can of course be also written as an arrow function expression:
setTimeout(() => alert("Hello!1!"), 1000);
Video: Arrow function expression
So, named and anonymous functions can both be used in the same code depending on what feels easier to maintain. Here's another example:
function add(a, b) {
    return a + b;
}

function square(x) {
    return x * x;
}

add(1, 2);         // 3
square(7);         // 49
square(add(1, 2)); // 9

var myNumbers = [0, 1, 2, 3];

// Arrays have a map method
myNumbers.map(square); // [0, 1, 4, 9]

myNumbers.map(
    function (x) { // Anonymous function
        return add(x, 1);
    }
); // [1, 2, 3, 4]
Sometimes it is better to use a named function. Named functions seem more important - important enough to be named. Anonymous functions are often used when the name is irrelevant, for example, in event handling, but also:
var myNumbers = [1, 2, 3, 5];

// Takes a number and returns it squared
const squareNumber = function(num) {
    return num * num;
};

const squaredAnon = myNumbers.map(
    function(x) { return x * x; } // This function doesn't have a name
); // returns [1, 4, 9, 25]

// Arrow function shortcut is available from ES6
const squaredAnon2 = myNumbers.map(x => x * x); // returns [1, 4, 9, 25]

const squaredNamed = myNumbers.map(squareNumber); // returns [1, 4, 9, 25]

// prints [1, 4, 9, 25]
squaredAnon.map(function(num) { console.log("This number is: " + num);});

// prints [1, 4, 9, 25]
squaredNamed.map(function(num) { console.log("This number is: " + num);});

// prints [1, 2, 3, 5]
myNumbers.map(function(num) {
    console.log("This number is: " + num);
});
And finally, an anonymous function can also be used for immediately invoked function execution. You can use this if you want to create a function and execute it immediately after declaration:
(function() {
    alert("Welcome to my website!1!");
})();
Inside the first set of parenthesis is the definition of the function expression. The second, trailing set of parenthesis calls the function. You may also pass arguments to such function, like this:
let message = "hello";

(function() {
    alert(message + ", you");
})(message);
Number types
number is internally a 64 bit floating-point number. This causes some behaviour that is not desireable:
0.1 + 0.2 === 0.3; // false

const biggestInt = 9007199254740992;
const smallestInt = -9007199254740992;
const expNumber = 7.5e2; // 7.5 * 10^2 i.e. 750
const hexNumber = 0xFF; // 255
BigInt can be used with integers larger than 2^53 - 1:
const bigOne = 2n**30n;
console.log(bigOne); // prints 1073741824n
typeof bigOne; // prints "bigint"
Not all browsers support BigInt just yet. You can see which browser versions support it in http://www.caniuseit.com.
Arithmetic operations
Arithmetic operations have been very similar in the majority of programming languages I've seen.
| Operator | Operation |
|---|---|
+ |
Addition |
- |
Subtraction |
/ |
Division |
* |
Multiplication |
% |
Remainder (there is no modulo) |
++ |
Increment |
-- |
Decrement |
** |
Exponentiation (from ES6) |
String
Strings in JavaScript are enclosed with either single or double quotes and consist of 0 - N characters. Characters can be escaped with the backslash character (\).
let text = 'This is fine.';
let anotherText = "And so is this.";

let someQuote = "He said: \"It'a a fine day\".";
console.log(someQuote); // He said: "It's a fine day".
let instruction = 'Set attribute to color="red"';
console.log(instcution); // Set attribute to color="red"
Strings have a number of useful methods and a length property:
let someText = 'This is my text';
someText.length; //15
someText.split(' '); // Split by space, produces: ["This", "is", "my", "text"]
someText.toUpperCase(); //"THIS IS MY TEXT"
You have seen many examples of concatenating text with variables. This is, in fact, so common that there is finally an easier way of concatenation than just using the plus symbol:
let name = "Peter";
let age = 47;

// The old way
let someText = name + " is " + age + " years old";

// and the new
let newText = `${name} is ${age} years old`;
Notice, that I did not use single quotes, I used backticks.
Booleans
Booleans in JavaScript are true and false. But in JavaScript being truthy or falsy is more complicated than just that. There are two comparison operators: == and ===. This is one of the times when JavaScript tries to be helpful and ends up causing trouble. When using the == comparison, falsy values are false, 0, -0, '' (empty single quotes), "" (empty double quotes), null, undefined, NaN. All other values are truthy, even ' ', "false", {} (empty object).
Also:
1 == 1 // true
1 == "1" // true

1 === 1 // true
1 === "1" // false
Why the two comparators?
Press Ctrl+Shift+I to open the dev tools and in the console tab enter let num = prompt("gimme a number");. Insert a number on the prompt and then enter typeof num;. This should return String. Then enter [yournumber] == num;. This should return true, even though one is a string and the other a number.
If you want to treat a string as a number, you can try to parse it first with the parseInt() global function. Beware, however, that it is very liberal with its parameters.
Instead of using == as a comparator, you should use ===. This will avoid comparing apples to apple-looking oranges.
| Extra: Equality table for == comparison
Comments
Comments in JavaScript have the same sidenotes as with HTML and CSS: since the language is interpreted, the users can read all comments. Single line comments are inserted with //:
// this is a comment
var foo = 7; // setting foo to 7
Multiline comments start with /* and end with */:
/*
  This function takes two numbers
  and returns the sum of them
*/
function sum(a, b) {
    return a + b; // this line does all the work
}
Strict mode
As discussed at the start of this chapter, the fifth ECMAScript specification added a strict mode. The strict mode uses a subset of JavaScript features. Some features which are known to cause problems were removed. For example, some things which fail silently in normal mode will throw an error in strict one. For example:
function noStrict() {
    message = "This is a bad idea";
}

function strict() {
    "use strict";
    message = "This will throw an error";
}

strict(); // message is not defined, will throw ReferenceError
noStrict(); // works

// Calling these functions in reverse order will work,
// since the message will get bound to global scope
| Extra: Mozilla Developer Network - strict mode
Variable scope
The scope is an important basic topic in understanding JavaScript code. Scope determines the accessibility and visibility of variables. JavaScript has three types of scopes:
- Block scope
- Function scope
- Global scope
Block scope is not one of the OG scopes in JavaScript - it was introduced in ES6 as sort of a side-effect of the new let and const keywords. If you declare a variable inside a block (i.e., { }) using let or const, the variable cannot be accessed from outside of that block. Variables declared with the old var keyword, however, do not have block scope and can therefore be accessed outside the declaration block:
{
    let x = 1;
    var y = 2;
}

console.log(x); // can't access x
console.log(y); // can access y
Function scope is the scope inside a function. If a variable is declared within a JavaScript function, it becomes local to that function:
function localVars() {
    let x = 1;
    var y = 2;

    console.log(x, y); // This is OK
}

console.log(x, y); // This is not going to work
Global scope is the scope where variables are bound if they are defined outside of a function or if they are defined in a block but with the var keyword.
Variable hoisting
In JavaScript, declarations are moved to the top by default. What this means is that a variable can be declared after it has been used. And in other words, a variable can be used before it has been declared. For example this:
x = "what!?";   // Assign

console.log(x); // Use

var x;          // Declare
... will give the same result as this:
var x;          // Declare

x = "what!?";   // Assign

console.log(x); // Use
Why did this happen? Hoisting is JavaScript's default behavior of first checking through the code and moving all declarations to the top of the current scope (current script or the current function). That's why the first example is behind the scenes actually identical to the second example. This behavior applies to variables declared with the var keyword. Variables declared with let or const are hoisted on the top of the block, but are not initialized. This means that the block of code is aware of the variable, but the variable cannot be used until it has been declared:
x = "what!?";

let x; // oops, ReferenceError

y = "even more dangerous";

const y; // total failure: syntax error
JavaScript only hoists declarations. Initializations are not hoisted. This means, that this:
var x = "what!?";
var y = "how!?";

console.log(x, y);
... does not give the same result as this:
var x = "what!?";

console.log(x, y); // y = undefined

var y = "who!?";
So, y was hoisted and therefore was in fact declared before it was used, but because initializations are not hoisted, y had the value of undefined at the time of the console.log().
Hoisting in strict mode
When using the strict mode (remember the "use strict"; declaration), JavaScript won't allow variables to be used if they are not declared. And as discussed before, the use of some ES6 features forces the strict mode implicitly.
Since hoisting can cause unexpected behavior - unexpected to novel coders at least - it might be reasonable to declare your variables at the top of each block.
The conditional operator
The conditional operator is the only ternary operator (three operands) in JavaScript. It has three operands, divided first with a question mark (?) and then a colon (:). The operands of the conditional operator may be of any type.
// Returns the absolute value of the argument
function absoluteValue(val) {
    return val > 0 ? val : -val;
}
The first operand is evaluated and interpreted as a boolean. If the value of the first operand is truthy, then the second operand is evaluated, and its value is returned. And if the value of the first operant is falsy, then the third operand is evaluated, and its value is returned. In the example above, we get the absolute value of an argument. So, if the value evaluates as a positive number, we return the value unchanged. However, if it is not a positive number, we return the negation of it.
Only one of the second and third operands is evaluated; never both.
The first-defined
This is a new feature of the language and only a short hand for existing functionality. But, you might start to see this used more and more, so it is important to at least be aware of what this is.
The first-defined operator (??), also know as nullish coalescing operator, evaluates to its first defined operand. This means that if the left hand side operand is not null or undefined, the operation evaluates to its value. If the left hand side operand is null or undefined, the operation evaluates to the value of the right hand side operand.
For example, we have a method that requires certain settings as a parameter. We get the parameters from an API, for example, and need to make sure, that required values have been defined and if they have not been defined, we use default values. One solution is to write a wrapper function that checks the values and sets default values when necessary:
// Without first-defined
function startEngine(settings) {
    let speed = (settings.speed !== null && settings.speed !== undefined)
        ? settings.speed : 80;
    let direction = (settings.direction !== null && settings.direction !== undefined)
        ? settings.direction : "forward";

    // [ ... ]
    engine.start({ speed, direction });
}

// With first-defined
function startEngine(settings) {
    // [ ... ]
    engine.start({
        settings.speed ?? 80,
        settings.direction ?? "forward",
    });
}
The first-defined operator can drasticly reduce the amount of code needed to prepare for missing values when working with APIs.
{speed} or {speed:speed}
When forming an object, if the key in the object is the name of the variable, you can omit the repetition of the name. For example:
let speed = 10;
let localRotation = 90;

// This is the same as let options = { speed: speed };
let options = { speed };

// However, when you change the name, you have to be explicit
let options = { rotation: localRotation };
The typeof operator
As variables can change their type during execution, you will often need to check their current type. This can be done using the typeof operator. So, not a method or a function, but an operator.
// prints string
console.log(typeof "Hello");
typeof is a unary operator that is placed before its single operand. Its value is a string that specifies the type of the operand.
| variable | typeof variable |
|---|---|
| undefined | "undefined" |
null |
"object" |
true or false |
"boolean" |
any nunber or NaN |
"number" |
| any BigInt | "bigint" |
| any string | "string" |
| any symbol | "symbol" |
| any function | "function" |
| any nonfunctional object | "object" |
The comma operator
The comma operator work the same way as with many programming languages, meaning that this:
let a = 0, b = 1, c = 2;
... is the same as this:
let a = 0;
let b = 1;
let c = 2;
And you can use it in much the same way as with other programming languages. For example:
for(let x = 0, y = 10; x < y; x++, y--) {
    console.log(x, y);
}
Statements
Writing statements works the same way as with many other programming languages, so there should not be any need to explain these in detail.
// Assignment
greeting = "Hello " + name;
i *= 3;

// Increment, decrement
x++;
y--;

// delete operator deletes an objects property
delete o.x;

// Function calls
console.log(greeting);
startEngine();

// Pointless function call
Math.cos(x);

// Function call and return value assignment
cx = Math.cos(x);
Compound and empty statements
Just as the comma operator combines multiple expressions into a single expression, a statement block combines multiple statements into a single compound statement.
A sequence of statements enclosed within curly braces act as a single statement and can be used anywhere that JavaScript expects a single statement:
{
    pi = Math.PI;
    cosPi = Math.cos(pi);
    console.log("cos(pi) = " + cosPi);
}
Notice, that unlike some other closing curly braces, the compound statement does not end with a semicolon. And unlike with JavaScript objects, the primitive statements within the block do end with semicolons.
Don't let this scare you. You might know compound statements as the "typical" statements. You see, the structure of an if block, for example, is as follows:
if (expression)
    statement

// or

if (expression) statement
This statement part can be a single statement, such as:
if (a > 0)
    console.log("a is greated than 0");
... or a compound statement, such as:
if (a > 0) {
    console.log("a is greated than 0");
    console.log("and here's another statement");
}
The empty statement is just what it sounds like. Do not write a statement, just write the ending semicolon:
;
But why?
Well, the empty statement can be used to, for example, create a for -loop without a body. For example:
let arr = Array(5);

for(let i = 0; i < arr.length; arr[i++] = 0) ;
What did that code do? Assuming we have an array arr and we want to initialize all of its cells with a value (in this case 0), we can do all of that with just the arr[i++] = 0 part without needing a loop body.
However, it might be more common to see this using an empty compound statement instead of an empty statement, although there is no need for such:
for(let i = 0; i < arr.length; arr[i++] = 0) {};
But just as a side note, this is not the easiest way of initializing arrays to a default value. Such operation can be done using the fill() method:
let a = new Array(5); // => [empty * 5]
a.fill(0); // => [0, 0, 0, 0, 0]
a.fill(9, 1); // => [0, 9, 9, 9, 9]; fill with 9 starting at index 1
a.fill(8, 2, -1); // => [0, 9, 8, 8, 9]; fill with 8, start at index 2, end at index last -1
On the note of having empty parts, just to be aware of, we can omit parts of a for -loop as well, albeit this is common in most programming languages:
let i = 0, arr = ["a", "b", "c"];

for(; i < arr.length; ) {
    console.log(arr[i++]);
}
We do not necessarily need to initialize or increment/decrement the index value of a for -loop inside the for -loop statement.
And as a final note about semicolons, forgetting extra ones in your code can lead to difficult to find bugs. Consider the following examples:
// This code works as expected
if ((x == 0) || (y == 0))
    o = null;

// This code works, but not as expected
if ((x == 0) || (y == 0));
    o = null;
Control structures and loops
If, else, switch
The control structures are similar to those in many other languages, so there probably is no strong need to go over these in too great detail. We have the normal if..else statement, with an optional else if:
if(showDebugInfo) {
    console.log("LOG: something happened");
}

if(age < 21) {
    console.log("I can't serve you Vodka");
} else {
    console.log("Будем здоровы!");
}

if(animal == "canine") {
    console.log("You are a dog");
} else if(animal == "feline") {
    console.log("You are a cat");
} else {
    console.log("You are something else, alright!");
}
In the last example, you might also consider using a switch statement:
switch(animal) {
    case 'canine':
        console.log("You are a dog");
        break;
    case 'feline':
        console.log("You are a cat");
        break;
    default:
        console.log("You are something else, alright!");
}
Now, else if is not really a statement in JavaScript, but rather a common idiom. Some languages have a reserver word for this, like elif in Python, but with JavaScript else can be followed with if just like with any statement.
So, this example with else if:
if(i === 1) {
    // execute #1
} else if (i === 2) {
    // execute #2
} else if (i === 3) {
    // execute #3
} else {
    // execute #4
}
... is the same as this example written with the syntactically equivalent, fully nested form:
if(i === 1) {
    // execute #1
}
else {
    if(i === 2) {
        // execute #2
    }
    else {
        if(i === 3) {
            // execute #3
        }
        else {
            // execute #4
        }
    }
}
The first one is just shorter to write and arguably easier to read.
The definition of an if conditional is as follows:
if (expression)
    statement1
else
    statement2
As you know, you can replace the statements with compound statements, that is, add curly braces. As any statement can be replaced with a compound statement, you can freely mix-and-match:
x = y = 4;
z = 6;

if (x == y) {
    if(y == z)
        console.log("x equals z");
    else
        console.log("x does not equal z");
}
Here, however, lies a danger:
x = y = 4;
z = 6;

if (x == y)
    if(y == z)
        console.log("x equals z");
else
    console.log("x does not equal y"); // WRONG!
The indentation means nothing here. The else keyword is paired with the closest if keyword, unless compound statements are used. Because of this, many programmers stick with using only compound statements, even if for just one statement:
x = y = 4;
z = 6;

if (x == y) {
    if(y == z) {
        console.log("x equals z");
    }
} else {
    console.log("x does not equal y");
}
Refactor to fewer levels of indentation
When beginner programmers write conditionals, they tend to write the logic using many levels of indentation and nested if conditionals. This can lead to messy code that is difficult to follow.
A good rule of thumb is that if you have more that three levels of indentation, you might need to refactor your code.
You can break stuff into methods to reduce the need for nested levels of indentation. Sometimes it also helps to negate things. For example:
// Unnecessary indentation
function a(b) {
    if(b !== null) {
        console.log(b);
    }
}

// Negation to rescure
function a(b) {
    if(b === null) return;

    console.log(b);
}
For, while, do-while
JavaScript has many similar loops as, for example, Java. For example, while:
while(myFile.hasMoreLines() === true) {
    let line = myFile.readLine();
    // ... actually do something here
}
... and do..while statements:
const secret = "password";
let given_secret = '';

do {
    given_secret = prompt("Please, input secret code");
} while (secret !=== given_secret);

// we do not need to check for type here with '===',
// as we know they are both strings,
// but it is a good habit
For loop is a different story. There are many flawors of for, each behaving a little differently. The normal for loop should look familiar:
let myArray = ["Jack", "Jim", "Jill"];

for(let i = 0; i < myArray.length; i++) {
    console.log("I'm busy, go bother " + myArray[i]);
}
The definition of a for loop is the same as with most programming languages:
for(initialize; test; increment)
    statement
... or in other words, for is a short hand for this while loop:
initialize;
while(test) {
    statement
    increment;
}
There are also two other for loops, for..of and for..in. These have differences in behaviour, so if you are not confident in using them, you might be better off just sticking with normal for loop. But let's still look at some examples of them.
for..of with an array object: this example has a special thing going on - we are adding a property newField1 to our array object. It is not an array element - it is a property. for..of works well for accessing the array elements, but completely ignores the added property, unlike for..in.
let allKeys = "";
let allValues = "";
let allItems = "";

let mylist = new Array("Chinese", "English", "French");

mylist.newField1 = "Something";

for (let key in mylist) { // OK, but does not guarantee the access order (!)
    allKeys += key + " ";
    allValues += mylist[key] + " ";
}

for (let item of mylist) { // access in the indexing order
    allItems += item + " ";
}

// allKeys contains "0 1 2 newField1"
// allValues contains  "Chinese English French Something"
// allItems contains   "Chinese English French"
Objects are not by default iterable. Attempting to use for..of on a regular object throws a TypeError at runtime. If you want to iterate through object properties, you have to use either for..in or for..of with the Object.keys() method. for..in should be used with care though, as it might not work how you first thought. It is a special syntax to iterate through all of the properties in an object.
for(let variable in object) {
    // do something with the properties
}
In the example above, variable takes the name of each property in the object. There is no guarantee of the order in which the properties are accessed. It is possible to use this to iterate all of the elements in an Array object, but once again, the order is not guaranteed.
for..of can be used outside of objects, as well:
let freq = {};

for(let char of "missisippi") {
    if(freq[char]) {
        freq[char]++;
    } else {
        freq[char] = 1;
    }
}

// freq: {m: 1, i: 4, s: 4, p: 2}
What's with both for..of and for..in?
for..in has been a part of the language since the beginnig. You can offer it any type of variable. However, it does not guarantee access order and can behave "oddly" in certain scenarios. for..of was introduced in ES6 to make it easier to complete certain tasks, such as iterating lists in order.
Breaks
With loops you might also need to break out of them prematurely. For this, you can use the break keyword:
for(let i = 0; i < haystack.length; i++) {
    if(haystack[i] === needle) break;

    // No need to process the rest of the haystack
}
Continue
Similarily, continue can be used to "skip" over one loop iteration:
for(let i = 0; i < prices.length; i++) {
    // the price for this item is not set
    if(!prices[i]) continue;

    total += prices[i];
}
Error handling
Error handling in JavaScript is quite similar to other programming languages. We have the try, catch, finally, and throw keywords:
try {
    let x = 7 / 0;
} catch (error) {
    console.log("Sorry, we could not do that.");
} finally {
    console.log("Done with the command, successfully or not.");
}
The throw keyword is quite simple. It allows you to create a custom exception that can be a String, a Number, a Boolean, or an Object:
if(size > 5) {
    throw "Too big";
}
If you place this inside a try, you can then catch it and see the value (in this case "Too big") as the parameter to the catch block.
Objects
Objects in JavaScript are containers for properties.
These properties have a name - also known as key - and a value. The value can be of any type, for example, other structured types like Object, Array, or Function.
To initialize an Object you can use new Object(), Object.create(), or a literal notation:
// literal notation
let person = { 'name': 'Bill', 'age': 50 };
Objects can also be created from other objects:
// Inherits the properties of person
let anotherPerson = Object.create(person);

// Own properties override prototype's properties
anotherPerson.name = "Mary";
Object properties can be changed and new properties can be introduced by just assigning them:
person.favoriteColor = 'blue';
/* Now person is an object with following properties:
{
    name: "Bill",
    age: 50,
    favoriteColor: "blue"
}
*/
You may also use the bracket notation know from arrays:
// bracket notation is also possible
console.log(anotherPerson["name"]); // will print Mary
console.log(anotherPerson["favoriteColor"]); // will print undefined
And finally, you may remove properties from an object with the delete keyword:
delete anotherPerson.age; // removing a property
console.log(anotherPerson); // prints: Object { name: "Mary" }
Objects can have methods
Setting an object's property to a function will create a method for that object. Inside the method, the object itself can be accessed with the this keyword:
let person = { name: 'Bill', age: 50 };

// We set the greet property to a function
person.greet = function (greeting) {
    console.log(greeting + "! My name is " + this.name);
};

person.greet("Hello"); // prints: Hello! My name is Bill
person.greet("Hi"); // prints: Hi! My name is Bill

let anotherPerson = { 'name' : 'Mary', 'age': 51 };
anotherPerson.greet = person.greet;
anotherPerson.greet('Good day!'); // prints: Good day!! My name is Mary
Notice, how we copied the greet method from one person to another person, but the this keyword still referred to the calling object. So, My name is Mary instead of My name is Bill.
The arrow function is a more light-weight option for functions. It achieves it's light-weightyness by not chaging the binding for this. With normal functions the this keyword is bound to the context of that function. With arrow functions the binding of this remains at the callers context. Traditionally, we have had to jump through hoops if we wanted this to remain in the callers context (and we often wanted it to).
Warning
You should be careful using the arrow function expression for methods as they lack bindings for this and super.
Extending objects
A common operation in JavaScript is needing to copy the properties of one object to another object. It is easy to do that with code like this:
// Introduce two simple objects using the literal notation
let target = { x: 1 }, source = { y: 2, z: 3 };

// Object.keys() returns the keys
for(let key of Object.keys(source)) {
    // bracket notation makes this easy
    target[key] = source[key];
}

// target: { x: 1, y: 2, z: 3}
As this is a very common task, many methods for this have been implemented, one of which is the Object.assign(). This expects two or more objects as its arguments, and it modifies and returns the first argument object - the target object - but does not alter the second or later objects - the source objects.
Info
Object.assign() will use the get and set methods while copying the properties if such methods have been created, but will not copy those methods.
Let's look at some examples of this. The scenario is such, that some method needs many arguments. Some of these can be set as sensible defaults, but we still want the option to override some of them and to add new ones. For this, we want to have the settings object o that has the default values from defaults, but also whatever overrides and extra settings presented in o:
// overwrites everything in o with defaults,
// so not what we want here
Object.assign(o, defaults);

// first assign an empty object,
// then the properties of the defaults,
// and finally override both with the original values
// this is what we want
o = Object.assign({}, defaults, o);

// you can also make this even shorter by using the ...spread operation
// (check the video on rest and spread)
o = {...defaults, ...o};
Serializing objects
We will cover the JavaScript Object Notation (JSON) in this chapter, but chances are you have seen that notation already somewhere. Objects can be serialized as JSON. As JSON they can be stored wherever strings can be stored: database, browsers local storage, text files, etc.
This is simple, and can hence be presented with a simple example:
// first, let's create a test object for this example
let o = {x: 1, y: {z: [false, null, ""]}};

let serialized = JSON.stringify(o);
// serialized: '{"x":1,"y":{"z":[false,null,""]}}'

let parsed = JSON.parse(serialized);
// parsed: {x: 1, y: {z: [false, null, ""]}}
Prototype-based inheritance
In JavaScript, inheritance is prototype-based and not class-based, like in Java or C++.
Instead of classes, Javascript has objects... everywhere. And these objects can have properties, and these properties can be of any type, even functions.
Info
ES6 brought support for classes, but the prototype-based inheritance was not removed.
JavaScript objects have a property __proto__, which is a link to another object, the prototype. The object will inherit all the properties - including functions - of this linked prototype object.
Prototypes can have prototypes too, this will lead to a prototype chain. The prototypes at the end of the prototype chain are the Object and then finally null, in most cases.
There are several ways for setting the prototype for an object. Object.create() is a reasonable choice.
For a thorough look at inheritance using prototypes, read Mozilla Developer Network's Details of the object model.
Let's take a look at an example of prototypal inheritance:
// Let's create an object
const protoObject =
{
    myProperty: "nice",
    myMethod: function (input) { console.log(`I received ${input}`); }
}

console.log(protoObject.myProperty) // Prints out "nice"
protoObject.myMethod('a cake'); // Prints out "I received a cake"

// Let's create another object using the first one as its prototype
const newObject = Object.create(protoObject);

console.log(newObject.myProperty) // Prints out "nice" still

// Changes in the prototype object are reflected
// in the objects which inherit from it
protoObject.myProperty = "new and improved!"
protoObject.myMethod = function () { console.log(`My property is ${this.myProperty}`) }

newObject.myMethod() // Prints out "My property is new and improved!"

Object.getPrototypeOf(newObject);
//prints "{ myProperty: 'new and improved!', myMethod: [Function] }"
How do you know if some property belongs to this object or its prototype? You can use the hasOwnProperty() method to check for that. To avoid enumerating inherited properties with for..in, you can add an explicit check inside the loop body:
for(let p in o) {
    if(!o.hasOwnProperty(p)) continue;

    // Otherwise list property
}

// Aslo
for(let p in o) {
    if(typeof o[p] === "function") continue;

    // Do not list object methods
}
Class in JavaScript
The class keyword can be used to create objects which wrap up properties and methods. The prototype of the created classes is Function.
Using classes enables easy instantiation of multiple objects from the same class. Objects can have the same properties with different values and methods may change the values. There is a special method, the constructor method, which will get automatically called when you use the new keyword.
class Pizza {
    constructor() {
        console.log("One Pizza coming right up!");
    }
}

let p = new Pizza(); // Prints "One Pizza coming right up!"
You can of course pass arguments to the constructor when using the new keyword:
class TodoItem {
    constructor(task = "go to sleep") { // parameter default value
        this.task = task;
    }

    print() {
        console.log(this.task);
    }
}

let ti1 = new TodoItem("go to the store");
let ti2 = new TodoItem();

ti1.print(); // go to the store
ti2.print(); // go to sleep
Note, that both the class and the parameter default value used in this example are relatively new additions to the language and will not work in old browsers.
As with named and anonymous functions, there are two ways of creating classes. The class declaration we already saw:
class Polygon {
    constructor(width, height) {
        this.area = width * height;
    }
}

console.log(new Polygon(3, 4).area); // 12
... and the class expression:
const Polygon = class {
    constructor(width, height) {
        this.width = width;
        this.height = height;
    }

    area() {
        return this.width * this.height;
    }
};

console.log(new Polygon(3, 4).area()); // 12
Video: class and constructor in JavaScript
Get and Set
Looking at the Polygon examples above, in class declaration one, we accessed the area property directly. In class expression one, we accessed the same info through the area method. If you have experience of, for example, Java or C++, you might wonder about keywords like public, protected, and private. In JavaScript, providing access to a property and its value via get and set accessor properties prevents the data in class from being corrupted intentionally or accidentally.
get and set can be used to bind getter and setter functions which are used when the property is accessed:
const hand = {

    myArr: [],

    get last() {
        if(this.myArr.length === 0) {
            return "Sorry, the array was empty";
        }

        return this.myArr[this.myArr.length - 1];
    },

    set current(name) {
        this.myArr.push(name);
    }
};

console.log(hand.last); // Sorry, the array was empty

hand.current = "Ace of Spades";
hand.current = "King of Diamonds";
hand.current = "Seven of Clubs";

console.log(hand.myArr); // ['Ace of Spades', 'King of Diamonds', 'Seven of Clubs']

console.log(hand.last); // Seven of Clubs
A naming convention for private variables is to add an underscore in front of the property's name, for example, _myProperty, but note that this is only a naming convention and will not affect the visibility of properties.
Inheritance by subclassing
A new class, or a subclass, can be defined based on an existing class using the keyword extends. This is different from a class-based inheritance, although it looks deceivingly similar.
In the beginning of the constructor of the new class, you must add a call for the parent class's constructor and pass its parameters with the super():
class Person {
    constrcuctor(full_name)  {
        this.full_name = full_name;
    }
}

class Teacher extends Person {
    constructor(full_name, subject, qualification){
        super(full_name);

        this.subject = subject;
        this.qualification = qualification;
    }
}

const Farnsworth = new Teacher("Hubert J. Farnsworth", "tetragonist", "professor");

Object.getPrototypeOf(Farnsworth); // prints out "Teacher {}"

Object.getPrototypeOf(Object.getPrototypeOf(Farnsworth)) // "Person {}"

Object.getPrototypeOf(Object.getPrototypeOf(
    Object.getPrototypeOf(Farnsworth))) //  "{}" meaning Object

Object.getPrototypeOf(Object.getPrototypeOf(
    Object.getPrototypeOf(Object.getPrototypeOf(Farnsworth)))) // "null"
So, the prototype of the class instance (Farnsworth) is the class (Teacher). And the prototype of that is the prototype class (Person). Following the prototype chain further leads us to Object and then to null.
Using JavaScript objects, JSON
Let's start this with an example. Imagine we have a simple HTML file with some obvious placeholders in it:
<main class="show">
    <h1>The person:
        <span class="firstname"></span>
        <span class="lastname"></span>
    </h1>

    <p>The person is <span class="fiction">#</span>,
    with <span class="friends-nr">#</span> friends.</p>
</main>
Let's then add some JavaScript to it:
// an object with four properties
const person = {
    firstName: "Micky",
    lastName: "Mouse",
    isFiction: true,
    numberOfFriends: 63
}

// the object is used to fill in
// the missing information of the html page template
document.querySelector(".firstname").textContent = person.firstName;
document.querySelector(".lastname").textContent = person.lastName;
document.querySelector(".fiction").textContent = person.isFiction ? "fictive" : "real";
document.querySelector(".friends-nr").textContent = person.numberOfFriends;
The above code should not look too difficult now, but you can check it out in action:
So, we used a JavaScript object to hold our data and we used an HTML file as a template on which we added the data. Even though this might seem pretty simple, it is actually a very important topic in web development: pretty many web pages are exactly like this - an HTML page for a template to which data is added. Granted, the data would not be hard-coded but rather be obtained from an API most likely, but still.
Nested objects in literal notation
A JavaScript object can have nested elements. These can be separated with commas and references using periods:
const triangle = {
    // Declare properties (each an object of two props)
    p1 : { x : 0, y : 3 },
    p2 : { x : 1, y : 4 },
    p3 : { x : 2, y : 5 }
};

console.log(triangle.p1.y); // Prints 3
JSON
JSON stands for JavaScript Object Notation. It has two structures:
- A collection of name/value pairs. In various languages, this is realized as an object, record, struct, dictionary, hash table, keyed list, or associative array.
- An ordered list of values. In most languages, this is realized as an array, vector, list, or sequence.
For example:
{
    "author": "Mika Waltari",
    "date-of-birth": "1908-09-19",
    "date-of-exitus": "1979-08-26",
    "genres": ["novel", "novella", "play", "movie", "poem"],
    "novels": [
        {
            "title": "Suuri illusioni",
            "year": 1928
        },
        {
            "title": "Appelsiininsiemen",
            "year": 1931
        }
    ]
}
In the example, we see values as primitives, such as with title and year, values as arrays, such as genres, and values as arrays of objects, such as novels. All of these can, and often are, used together. This is pretty much the sort of data you might get as a response from an API.
JavaScript modules
The motivation to use modules comes from the want to not have all code in one document. Modules makes organizing and re-using code much easier.
In the first chapter, we briefly discussed Node.js modules with the require() and exports. In the browser context, you are advised to use the ES6 Modules. It is the intention that both the browser and Node.js would transition to using ES6 Modules at some timeframe. But who knows when that will happen and even if it happens at all, so we will not spend too much time discussing it. In any case, the syntax is not too different.
ES6 Exports
To export a constant, variable, function, or class from an ES6 module, simply add the keyword export before the declaration:
export const DOMAIN = "http://api.myapp.com";

export function greet(name) { return "Hello, " + name ;}

export class Person {
    constructor(name) { this.name = name; }
    speak() { return "Hello, my name is " + this.name; }
}
Alternatively, you can specify the exports in one line referencing the declarations:
const DOMAIN = "http://api.myapp.com";

function greet(name) { return "Hello, " + name ;}

class Person {
    constructor(name) { this.name = name; }
    speak() { return "Hello, my name is " + this.name; }
}

export { Person, greet, DOMAIN };
It is common to write a module with just one class or function, in which case you can simply use a default export:
export default class Person { /* ... */ }
Default exports are slightly easier to import that non-default exports.
ES6 Imports
You import things with the import keyword. The simplest form of import is useed for modules that define a default export:
import Person from './person.js';
Since the export is an object literal, you may use the object destructuring method to pluck items to import:
import { greet, DOMAIN } from './example.js';
... or simply import everything using:
import * from './example.js';
Finally, you can rename items when importing (e.g., if clashing names from two different imports):
import { speak } from './person.js';
import { speak as bark } from './dog.js';
DOM and events
In chapter 3, we already took a sneak peek at manipulating the DOM with JavaScript. Document Object Model, or DOM for short, is the way we can access and manipulate HTML with JavaScript. Generally, it is a pain to work with, which is why we use JavaScript libraries to make it tolerable. But, before libraries, let's take a look at what it is like in "plain" JavaScript:
// get the element with id js_dom_h2
document.getElementById('js_dom_h2');

// change the contents of an element
document.getElementById('js_dom_h2').innerHTML = 'DOM might be a handful';

// create a new element
var newElement = document.createElement('small');

// set the content of the new element
newElement.innerHTML = '... but you learn to live with it';

// put the element inside the <h2> of the page
document.getElementById('js_dom_h2').appendChild(newElement);
What makes manipulating DOM directly particularly painful is that there are browser-specific differences. Libraries handle these differences so you do not need to worry about them and you can focus on the real problem that you are solving at the moment.
In referring to specific parts of DOM tree, standard methods provided by the language are favoured to specific libraries such as jQuery. These methods include:
querySelector()querySelectorAll()getElementById()getElementsByClass()getElementsByTagName()
Events and event handling
Events were also looked at back in chapter 3 from a practical viewpoint. Let's now continue with events in a bit more detail. Event handling can be divided into three parts:
- Querying and accessing the element which we want to react to an event
- Writing the event handler function that changes the element when the chosen event happens
- Attach the event handler to the element
Let's look at a simple example. Imagine we have a button on our page that has an attribute id="specialButton" and we want to attach an event handler to it so that when the button is clicked, an alert is shown:
document.getElementById('specialButton').onclick = function (event) {
    alert("Someone clicked the special button!");
};
In this example, an anonymous function is added to the element that has the id of specialButton. The anonymous function gets executed when the specified event happens, in which case an alert is shown.
We can also use JavaScript to trigger events. Having assigned the above event handler, we can proceed to trigger the event:
document.querySelector("#specialButton").click(function() {
    console.log("We clicked the special button!");
});
Of course, the event will also be triggered on click. But it is good to be aware that code can make it seem like you clicked your mouse.
We have now covered HTML event attributes and DOM event handlers. There is, however, a big downside to using DOM event handlers: you may only assign one event handler to a specific elements specific event. Luckily, there is an alternative: DOM event listeners. With event listeners, an event can trigger multiple functions. You can add and remove listeners to and from a collection of listeners assigned to an element's event.
// Let's first hunt down a reference to an element
let elem = document.getElementById("element");

// and add an event listener to its click event
elem.addEventListener("click", hide);
As a bit more practical event, let's imagine we have a password input element and we want to make sure that the user enters at least 8 characters into it. We can use the blur event, which gets triggered once the input element loses focus.
const MIN_LENGTH = 8;

function checkTheLength() {
    if(this.value.length < MIN_LENGTH) {
        // show an error message.
        // Perhaps change the visibility and content
        // of a visually error looking span element
    }
}

let elemt = document.getElementById("password");
elemt.addEventListener("blur", checkTheLength, true);
You may also want to remove an event listener from an element once some functionality is no longer needed on an element. This can be done using the removeEventListener() method.
elemt.removeEventListener("blur", checkTheLength);
So, the workflow is as follows: we have an element, we add or remove an event listener. The first parameter is the event we want to target and the second is the function - the event handler - we want to add or remove. There are more optional parameters for special needs, that you can check out at the Mozilla Developer Network website.
| Extra: Mozilla Developer Network - addEventListener()
Event handler
The first parameter of every event handler is an event object, which carries information on the event which triggered the event handler.
function eventHandler(event) {
    event.target.style.color = "red";
}

// you may also access the event object like this
function eventHandler2() {
    let e = arguments[0];
    e.target.style.color = "blue";
}
The information includes, for example,
- the target of the event (
e.target, the same asthisinside an event handler function) - the type of the event (
e.type) - if it was a key event, which key was pressed (
e.keyCode) - if it was a mouse event, wherein the window the event happened (
e.clientX,e.offset)
There's one more point about event handlers that needs to be addressed or at least pointed out. Take another look at this previous example code line:
elem.addEventListener("click", hide);
We are referencing some hide() function, making it an event handler by setting it as one of the event listeners of the click event. Notice something different compared with a typical function call? That's right - we do not have parentheses at the end. But here's the kicker: if we do not have parentheses at the end, then how can we pass parameters to the function? Well, we can't. If you really need to pass parameters to an event handler, you can create a work-a-round by using wrapper methods. But you might also just have some settings object visible for the method.
/* A wrapper function, which calls the event handler */
function wrapper() {
    checkTheLength(8);
}

/* The wrapper can also be anonymous */
function () {
    checkTheLength(8);
}
Functional paradigm
To examine the functions more closely, let's first establish a sample class to work with:
class Person {
    constructor(first,last){
        this.firstName = first;
        this.lastName = last;
    }

    fullName(){
        return this.firstName + " " + this.lastName;
    }
}
Now, function expressions are invoked with the parentheses (). Without the parentheses, a string containing the function expression is assigned as a value. For example, with the following expressions:
let person = new Person("John", "Doe");

const fName = person.fullName;

console.log(fName);
... the following text will be printed on the console:
fullName(){
    return this.firstName + " " + this.lastName;
}
As we already know, had we added the parentheses to person.fullName(), the output would have been John Doe. The parentheses can also be used to self-ivoke a function:
(function sayHi() {
    console.log("...remember me?");
})();
The first set of parentheses change the function declaration to a function expression. The latter set of parentheses self-invoke the expression. There are actually even more ways of defining functions in JavaScript. There's a succinct introduction to them available at w3schools.com.
| Extra: JavaScript Function Definitions - w3school
Callback passed as a parameter
When function A is passed to function B, and B executes A, A is know as a callback. This allows programmers to use functions written by others and to provide their own behavior. Callbacks can be executed either synchronousely (e.g., map) or asynchronously (e.g., setTimeout and event handlers).
Let's first look at a synchronous callback:
// Add is invoked once addFive() is called
function add(x, y) {
    return x + y;
};

// Higher order function
// referenceToAdd() is a callback
function addFive(x, referenceToAdd) {
    return referenceToAdd(5, x);
};

console.log("before");
console.log(addFive(6, add)); // 11
console.log("after");
Feel free to copy-paste this code into the console in your browsers the dev tools, but the output will be:
before
11
after
... which means, that there was no delay in execution. Asynchronous callbacks are a bit more complicated since there is less control in the order of execution due to different delays. One very prominent application area littered with asynchronous callbacks is when we start to request data from external sources, such as online APIs. We'll look at those in detail in the next chapter.
So, here add() is invoked once addFive() is called. addFive() is a higher-order function because it takes in a function reference as an argument. The function is passed in as an argument is a callback function.
Let's turn this around:
function add(x, y) {
    return x + y;
}

function higherOrderFunction(x, callback) {
    return callback(x, 5);
}

higherOrderFunction(5, add);
add() is now a callback passed as a parameter and executed in the outer function, that is the higherOrderFunction(). Instead of higher-order functions (HOF), mathematicians talk about function composition:
f ∘ g // "f circle g", or f(g(x))
Here, add(x, y) is called with x = 5 and y = 5, hence the result is 10.
Video: Bringing it all together
In this video, we continue working with the form from previous chapters. We refactor our server to use modules and we take a look at validating data. We also discuss the practical implications of asynchronous methods in anticipation of the next chapter.
While it may seem simple to work with a small form, it still covers important aspects of web development. Much of web development is sending data to a server and receiving it from a server.
Sidenote: How could we add the validation errors on the page?
We need to dynamically alter the markup for this. Templating engines, such as Handelbars, make this easy, but keeping with the theme, how could we do it by hand? Let's rewrite the serveStatic function into a serveDynamic function that accepts data and inserts that onto the page. First, let's add a placeholder in the index.html file for the message:
<h1>Send your resume</h1>
<p>Please, use the form below to submit your resume.</p>

<div class="error-messages">{{ message }}</div>

<form action="/" method="POST">

    <div class="wrap">
        <label for="name">Name:</label>
        <input type="text" name="name" id="name">
    </div>

    <div class="wrap">
        <label for="email">Email</label>
        <input type="email" name="email" id="email">
    </div>

    <div class="wrap">
        <label for="phone">Phone</label>
        <input type="tel" name="phone" id="phone">
    </div>

    <input type="submit" value="Send">
</form>
I'm using the {{ }} syntax, because it is not a part of HTML and is thus safe to replace in Node.js without breaking the HTML file.
const serveDynamic = (filename, message, response) => {
    fs.readFile(path.resolve(__dirname, filename), function(error, htmlPage) {
        if (error) die(error, response);

        // replace the placeholder with the dynamic data
        htmlPage = htmlPage.replaceAll('{{ message }}', message);

        response.writeHead(200, { 'Content-type': 'text/html' });
        response.write(htmlPage);
        response.end();
    });
};
Here we used the index.html as a sort of a template file and made changes to its contents dynamically. Mature templating libraries include also conditionals, loops, and breaking templates into smaller, re-usable components.
In this second video, we'll shift the focus to the frontend and dynamically add and remove fields from our form.
Notice in the video, that we are creating DOM nodes by hand. While this makes the video more clear, it might cause architectural issues in the long run. For example, someone editing the HTML markup might not notice, that changes need to added to the JavaScript part as well. For this reason, it might make more sense to have an HTML fragment as a template and the clone those DOM nodes in JavaScript. This way, making some small changes in the HTML will be automatically copied over to the generated DOM nodes and the developers do no need to remember to update two different places.
Summary
This was a long chapter, but many of the things presented here should be really trivial to someone with previous programming experience. It is still good to read it through to spot the differences that JavaScript has to some other programming languages.
Ask yourself
- You can use ES6 in your Node.js applications. Do you know some strategies to check if your ES6 code will also work in your browser and in other browsers?
- Do you know how to transpile ES6 to ES5 and when to do it?
- Do you know what are JSON objects?
- Do you know both Objects in JavaScript and Class in JavaScript?
- Do you understand subclass inheritance and prototype-based inheritance?