3. HTML, DOM, and events
Modern websites consist of three layers, three distinct, observable qualities: content, appearance, and behavior. In other words, the substance content, its visual appearance, and possible interactivity.
These three qualities are handled with HTML (for substance content), CSS (for visual appearance), and JavaScript (for possible interactivity).
Separating content from styles allows easy modifications without affecting unintended parts of a document. A unified look and feel can be achieved using a stylesheet.
"The mark of maintainable HTML, CSS, and JavaScript is when individual developers can easily and confidently edit parts of the codebase without those changes inadvertently affecting other, unrelated parts."
| Extra: Decoupling HTML, CSS and JavaScript by Philip Walton.
Let's start by taking a look at HTML, which is used to define the document structure and content.
HTML - The document structure and content
HTML is an abbreviation of HyperText Markup Language. It is used to convey the semantic structure and meaning of the content.
All browsers have default styles for HTML elements; similar, but not entirely matching. This can make styling webpages look the same across all browsers a frustrating task. Thus, many developers opt for reseting the default formatting first and building their design on top of that - in essence, setting the styles twice. So, HTML does affect the look and layout of the page, but that can (and often should) be overridden in CSS.
Older versions of HTML included elements for purely affecting presentation, but this is not the case anymore with HTML5. HTML4 had elements like <i> for italic and <b> for bold. HTML5 has replaced these with em for emphasis and strong for strong text. They are often used for the exact same visual end result, but a distinction between semantics and appearance has, however, been made.
Different versions of the HTML standard exist. We are using HTML5 on this course, but you will be exposed to other versions when visiting Stack Overflow, for example.
HTML example
The HTML file is just text. The file extension suggests to the OS, if not altered, that this file type should be opened with a browser. The browser reads the file content and renders the requested elements with the browser's default styles unless other styles are defined.
<!DOCTYPE html>
<html>
    <head>
        <meta charset="UTF-8">
        <meta name="viewport" content="width=device-width, initial-scale=1.0">
        <title>A simple page</title>
    </head>
    <body>
        <h1>A BIG heading</h1>
        <p>This is a paragaph of text.</p>
        <p>Quis aute iure reprehenderit in voluptate velit esse cillum
        fugiat nulla pariatur. Excepteur sint obcaecat cupiditat non proident,
        culpa qui officia deserunt mollit anim id est laborum.</p>
        <p>
        Here's a <a href="http://en.wikipedia.org/wiki/Lorem_ipsum">link</a>
        to "Lorem ipsum" in wikipedia.
        </p>
    </body>
</html>
HTML document structure
HTML documents start with a doctype definition. For HTML5 we use just the <!DOCTYPE html>. For HTML4, we had multiple doctype definitions, such as <!DOCTYPE HTML PUBLIC -//W3C//DTD HTML 4.01//EN" "http://www.w3.org/TR/html4/strict.dtd"> for HTML4 Strict, <!DOCTYPE HTML PUBLIC "-//W3C//DTD HTML 4.01 Transitional//EN" "http://www.w3.org/TR/html4/loose.dtd"> for HTML4 Transitional and <!DOCTYPE HTML PUBLIC "-//W3C//DTD HTML 4.01 Frameset//EN" "http://www.w3.org/TR/html4/frameset.dtd"> for HTML4 Frameset.
The rest of the document is then presented inside an <html> element in two major sections: <head> and <body>.
Inside <head>, title and meta elements are set. The meta elements describe the document with metadata, such as "who is the author of this page?", "what character encoding is used?", etc. Additionally, the definitions of stylesheets often reside here. Script tags may be added to <head> as well, but they are also sometimes added as the last element on the page.
JavaScript in the head vs JavaScript at the end of the body
Placing script tags in the <head> alongside other external resources, such as stylesheets seems like a natural position. Why then were script tags often added at the end of <body>?
When the browser encounters an external resource, it will make a request to the server to fetch this content. In HTTP1.1, this would halt the rendering of the page while the document was downloaded. Further, if the javascript was written as automatically invoking, it might reference an element on the page, that had not yet been rendered. Placing the script tag at the end of the page ensured, that all elements had been rendered.
HTTP2.0 can handle multiple simultaneous requests removing the first reason. The second reason can be fixed by invoking methods that rely on page content only after the DOM content-loaded event has been fired.
All HTML elements represented next go inside the <body>. <body> contains the actual content that is shown in the browser's main window. I say the main window, because some data in the <head>, mainly title and favicon, result in visible elements in the browser window - for title and favicon, they are shown on the tab.
UTF-8 character encoding
Encodings are easy to get wrong. The characters present in the English language should usually show correctly, but or Scandinavian characters, such as ä, ö, å, Ä, Ö, and Å, might be a cause for confusion. Further, many other languages have some characters not present in the characters of the English language. For historical reasons, these characters do not have the same binary representation in all areas - thus resulting in the wrong symbol being rendered.
Browsers try to guess the correct encoding, but to explicitly state what character encoding is used on the page, <meta charset="utf-8"> is inserted at the start of the <head> of the document. Many older Finnish websites use the ISO-8859-1 encoding, but we recommend using only UTF-8 from now on.
Encodings are easy to get wrong because there are typically multiple potential points of failure when loading a web page. The browser, the HTML document, the server, and (if a database is used) the database can all declare something wrong. For this reason, UTF-8 should be used consistently throughout the whole chain.
| Extra: The Absolute Minimum Every Software Developer Absolutely, Positively Must Know About Unicode and Character Sets (No Excuses!) by Joel Spolsky.
Body content
The body content is all the elements rendered inside the browser's main content area. It's these words you are reading right now. As the name states, it is HyperText. This means, that it can point to other HyperText documents with links.
| Extra: Check Wikipedia for the history of the word.
Markup means that you construct it by marking up text in a certain manner.
Language comes from the fact, that it has a specific syntax of expressing things.
Valid HTML
As a language, HTML defines syntax and grammar. Correctly constructed HTML is valid and well-formed. HTML is modeled based on XML, which is a similar-looking, tag and attribute-based syntax, but HTML is much less strict than XML. Further, browsers do their best to present poor-quality HTML in the best possible light, brushing many errors behind the scenes. Having said this, the browsers can't fix everything, and special cases, such as screen readers, can really lose their step when fed with malformed content.
Throughout this course, we expect that you will submit only valid HTML and CSS. Checking the validity of HTML and CSS can be done using W3C's validator services online: http://validator.w3.org.
What is W3C?
"The World Wide Web Consortium (W3C) is an international community where member organizations, a full-time staff, and the public work together to develop Web standards. Led by Web inventor and Director Tim Berners-Lee and CEO Jeffrey Jaffe, W3C's mission is to lead the Web to its full potential." - www.w3.org/consortium
Elements constructing the structure
The browser will happily render plain text. Still, normally the content on a webpage consists of elements. Elements are created by tags:
<tag>content</tag>
That is: start tag + content + end tag. For example, <body> starts the document body, then comes all the content visible in the browsers main area, followed by a closing </body> tag.
In addition, some elements do not have any content. For example, <br> forces content to start on a new line. This kind of void elements with only a start tag and no content can be self-closed (e.g., <br />), but this is not necessary. You do you.
| Extra: About self-closing and HTML5: To close or not to close.
Nesting
In essence, nesting means elements inside other elements. Nesting is what creates the tree-like structure we call DOM - The Document Object Model (more on this later) and it starts almost right away with the <html> tag having the <head> and <body> nested within it.
Nesting has strict rules:
- elements should be correctly nested:
- parents are placed within roots
- children are placed within parents
- some elements must not contain other elements
- for example, a link (
<a>) must not nest any other links inside its content
- for example, a link (
Let's illustrate some of these with concrete examples.
Nesting examples
This examples nesting does not violate nesting rules  :
:
<div>
    <p>
        This is some text and a <a href="http://google.com">link</a>
    </p>
</div>
But this one does  :
:
<div><p>
    This is some text and a <a href="http://google.com">link</a>
</div>
</p>
There's nothing wrong with this example :
<a href=""><p>This is a paragaph of text.</p></a>
But this is not going to fly :
<a href=""><p>This is a <a href="">paragaph<> of text.;</a></p></a>
It is in the nature of HTML, that levels of nesting, that is, the length of the DOM tree, can grow extensively. It is advisable to avoid creating extra nested elements (<div> being the usual suspect), as all the extra markup needs to be downloaded and parsed, but still, the level of nested elements can be quite much, for example:
Attributes
The start tag can have any number of attributes, global or local. The attribute is an attribute="value" pair inside the tag. For example:
<!-- href attribute contains the URL where the link leads-->
<a href="http://google.com">Google</a>

<p id="singleton">One of my kind, seek me with id.</p>

<!-- class attribute with value important_text-->
<p class="important_text">This paragraph has attribute called class
with the value of important_text. This can be used to style the element,
which we'll see in a moment.</p>
Here, id and class are the main hooks for CSS to target the element or collection of elements. They can be used globally in all tags. id identifies a single element on the whole document - there should never be two elements with the same id. class is used to target a group of elements - you can use the same class for as many elements of any type as needed.
Local attributes are specific for a tag, such as the type of an input element. These are tag-specific - a heading element cannot have attributes related to form submission, for example.
Comments and white space
Comments are visible only in code, the browser steps right over these without interest. The comments are thus intended for coders. However, HTML is just text, hence all comments are visible to everyone interested enough to click the view source menu option.
Comments start with <!-- and end with -->, between those any other tag is considered comment. For example:
<p>This will show up</p>
<!-- <p>This paragraph is hidden</p> -->
<a href="http://google.com">Visible link</a>
Since it is trivial to check out the comments on a webpage source code and since all characters - even the comments - have to be downloaded, it might not be wise to leave a ton of commented sections in production sites.
White space
Multiple white space characters, such as space, tab, line break, in an HTML document are collapsed into a single white space by default. You cannot indent content by smashing the spacebar. The below paragraph This should collapse should collapse into a single line:
Still, blank lines and indentation add to the readability of the code  .
.
One exception is content places inside the <pre> tag. This marks the content as preformatted and the browser should leave its white space alone.
A curated list of some HTML elements
The elements in HTML are plenty and there's hardly a reason for me to go through all of them right now. You'll learn the most common by heart and reach for the more arcane when you need to. But let's still go through some of the most common elements that you will need through this course.
| Extra: For the exhaustive list, refer to Mozilla Developer Network's HTML5 element list.
Elements - headings
Headings are defined from <h1> (most important) to <h6> (least important). Use them as you would use headings or topics in any text document.
Elements - links
Links to other documents can be defined by using the <a> tag.
The location of the other document is provided using the href attribute, for example:
<a href="http://google.com">Google</a>
In addition to linking to other documents, you can also link to sections within the current document. This is done by adding an id attribute to the target element and referring to that id in the href, for example:
<h1 id="page_start">This is at the top of the page</h1>
[[some content]]
<a href="#page_start">link to the top of the page</a>
The <a> tag has a special attribute, target, which can be used to specify how the link should be opened: <a target="_blank|_self|_parent|_top|framename">.
| Target value | Behavior |
|---|---|
| _blank | The link is opened in a new window or tab |
| _self | The link is opened in the same frame as it was clicked (default behavior) |
| _parent | The link is opened in the parent frame |
| _top | The link is opened in the full body of the window |
| framename | The link is opened in the named iframe |
Normally, the target attribute can be omitted and only reached for in specific scenarios. This allows the user to choose whether they want to follow the link or to open multiple links to new tabs in the background. Having said that links that result in downloading a document should (in my opinion) have target _blank, as sometimes pdf readers make it difficult to return to the previous page.
Elements - images
Images can be added to a webpage with the <img> tag.
The location of the image is specified with the src attribute, for example:
<img src="images/picture.jpg" alt="A picture of something">
The alt attribute is always required. Well, no, the world won't burn if you omit it, but let's just say, that you should include it. alt is short for alternative text, meaning it is used in place of the image when the image cannot be displayed.
| Extra: This is not strictly accurate, there's more to the story for those interested.
Elements - tables
Tables are meant for presenting tabular data. In the olden days of the web, tables might have been used also for placing elements by some misguided individuals  , but luckily those days have passed. Do not do this anymore. Tables must be used to display data - not for page adjustments. There are now better and much easier ways to achieve the layouts I was trying to achieve by using tables in the 90s.
Tables are introduced within the <table> and </table> elements. Further, they consist of table headers <th>, table rows <tr>, and table cells <td>.
Tables have many local attributes, but it might be useful to emphasize here, that:
<td>and<th>can have acolspanattribute, which defines how many columns they span- and
<tr>can have arowspanattribute to define how many rows it spans
Elements - lists
Lists are used to present items in a list form. There are three types of lists:
- ordered
<ol>, for numebered lists- Note also attributes "a", "A", "i", "I" for different numbering types
- unordered
<ul>, for bullet lists - definition list
<dl>, to give a list of definitions (also as description list)
List items in the first two are marked with a <li>. The definition/description list has pairs of <dt> (for definition term?) and <dd> (for definition description?), for example:
<ol>
    <li>First item</li>
    <li>Second item</li>
</ol>
<ul>
    <li>First item</li>
    <li>Second item</li>
</ul>

<dl>
    <dt>HTML</dt>
    <dd>HyperText Mark-up Language,  a way of describing
    content that can point to other similar documents</dd>
    <dt>CSS</dt>
    <dd>Cascading Style Sheets are a way of
    defining the presentation of HTML documents</dd>
</dl>
Elements - forms
Forms are used to send data from a browser to a server. Currently, <form> elements can only perform either GET or POST requests, hence they are most usable for the visitors of a webpage - a developer will most often communicate with the server via XHR (XMLHttpRequest) to be able to use all the HTTP verbs.
The communication happens via HTTP - HyperText Transfer Protocol.
<form action="/scripts/add_contact" method="POST">
    <p>First name: <input type="text" name="first-name"></p>
    <p>Surname: <input type="text" name="surname"></p>
    <input type="submit" value="Add">
</form>
This example would perform a POST request to /scripts/add_contact when the button with the label Add was pressed, sending us the request body the names and values of the input fields as key-value -pairs.
| Extra: Dive Into HTML5 - forms.
Elements - div and span
A <div> element is a generic container with no semantic meaning. It is, however, very important for dividing other content into containers that can be styled. class and id attributes enable the developer (and the browser) to differentiate these containers from each other and to assign styles to them using CSS.
Commonly, <div> "wraps" different parts (or even the whole document) for styling purposes. By default, a <div> element behaves as a block level element, which means that it creates a line break before and after the element. This behavior can, however, be changed.
Similarly, a <span> element can be used to mark a section of text or any flowing content for styling purposes.
<div id="some_paragraphs">
    <p>Some text with part of it in
        <span style="color: green;">green for no </span>reason.</p>
    <p>Some other text with part of it in
        <span style="color: blue;">blue for no reason</span></p>
</div>
So, by default a <div> is a block level element and a <span> is an inline element - a <div> will, by default, occupy all available horizontal space and a <span> will, by default, only that the space needed to contain its content.
Elements - iframe
An <iframe> can be used to embed another HTML document to the current document. The other document can be referenced with the src attribute, much like an image. If the embedded HTML document comes from another domain, there are some restrictions to what it can do.
<iframe src="https://plus.tuni.fi">
    Your browser doesn't support iframes
</iframe>
| Extra: Read more about iframes from Mozilla Developer Network - IFrame.
What's new in HTML5?
There are a fair number of new elements in HTML5. Some of them are used to define the semantics of the document further, while others provide new functionality. A good overview of important semantic elements can be found at Dive Into HTML5.
There are also plenty of new elements for embedding content into the webpage, such as <video> for videos and <canvas> for interactive bitmap graphics. Let's take as an example the new <figure> element:
<figure>
  <img src="/images/kittens.png" alt="Kittens" />
  <figcaption>A caption to go with the figure</figcaption>
</figure>
Wrapping an <img> element with a <figure> element together with a <figcaption> element ties them together nicely in the code, but there's nothing here that could not have been accomplished with just using <div>s.
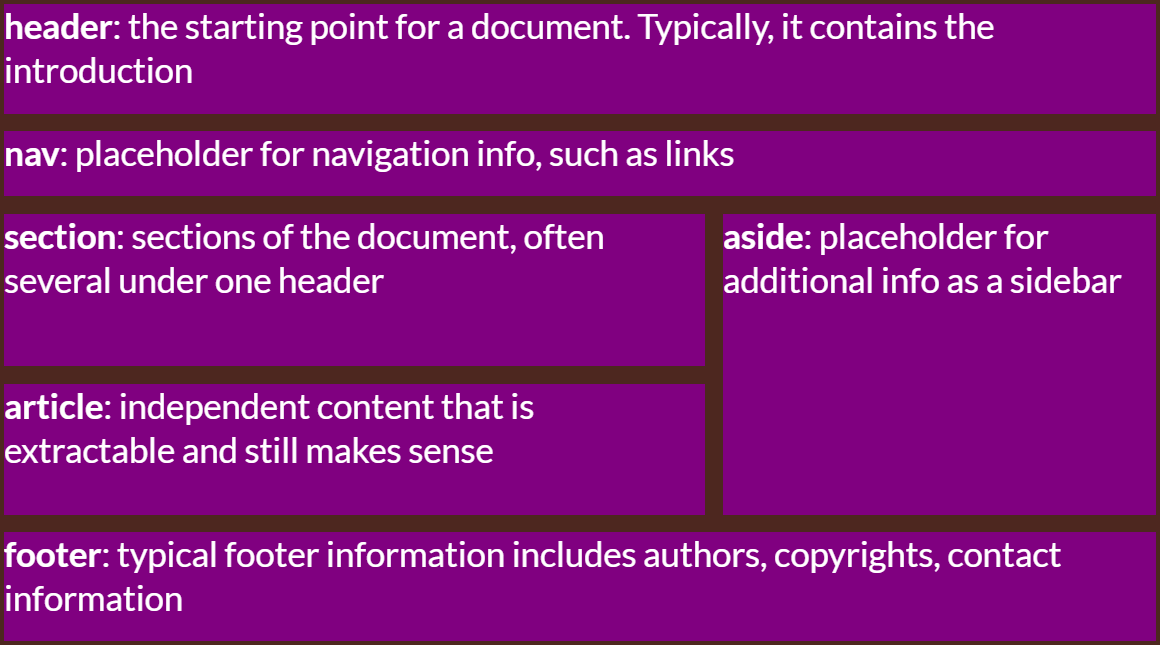
Towards more semantic tagging in HTML5
Semantic tags are to add specific meaning and categorize the content of an HTML page. You do not need to use them for styling purposes and they do not differ from normal <div>s in respect to how they can be used to contain content and how they can be styled. The average visitor is likely not going to know whether you have used a semantic tag or a <div> except if they are using a screen-reader. The semantic tags exist to provide semantics into the source code.
Here's a layout suggestion using the new semantic tags:
Content model
Each element has a content model defined. The model describes
- the elements expected content
- the position of the elements, permitted ancestors and descendants
- if an element is "voidable"
- the elements content categories
- the elements permitted ARIA roles (for accessibility)
The content categories are visualized in the following interactive svg.
We've now introduced HTML elements. These elements together form what is knows as the DOM, or Document Object Model, tree.
DOM - The Document Object Model
"The Document Object Model is a platform- and language-neutral interface that will allow programs and scripts to dynamically access and update the content, structure, and style of documents." http://www.w3.org/DOM/
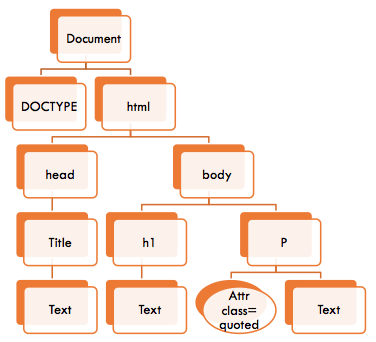
The document object model presents documents as a hierarchy - a tree - of Node objects. Some of these nodes are leaf nodes, i.e., nodes without children, such as text inside elements and HTML comments. Other nodes can have child nodes, such as the Document (the root element), HTML elements, Attr (Attribute - value pairs.)
Here's an example of how a simple HTML5 document is presented as a DOM tree:
<!DOCTYPE html>
<html>
    <head>
        <title>Example</title>
    </head>
    <body>
        <h1>Heading</h1>
        <p class="quoted">Some text</p>
    </body>
</html>
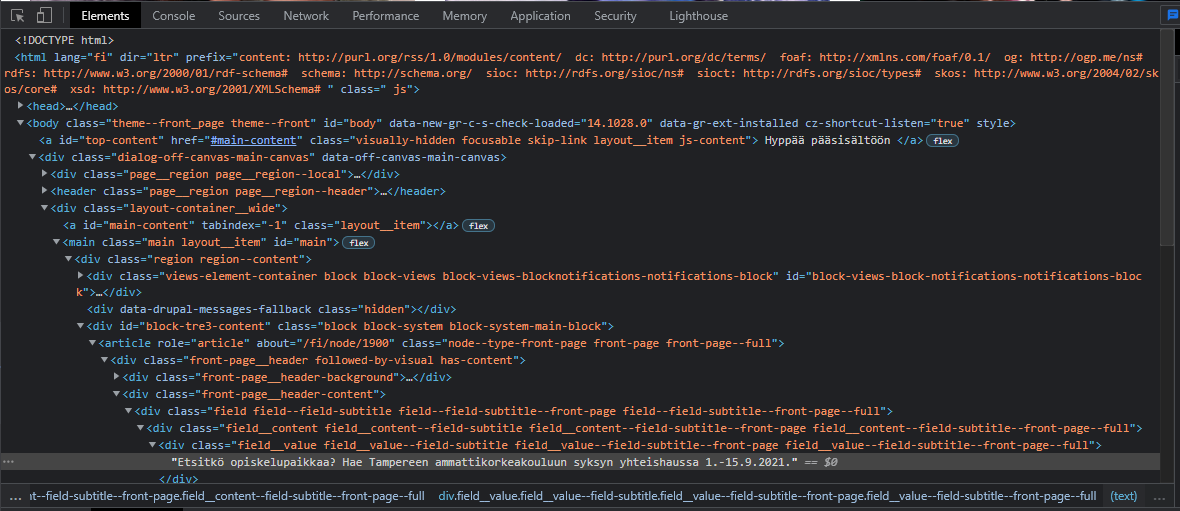
Video: Using browsers dev tools to inspect and modify the DOM
Accessing DOM elements in JS
To add interactivity to a webpage, it is often needed to target the elements on the page. This could be done to, for example, add an event listener on an element, modify elements content or visuals, insert or remove nodes on the DOM tree, etc.
In JavaScript, individual elements can be accessed in multiple ways. You can traverse the DOM tree by accessing the parent or one of the children of any DOM node. A more common way is to use the id and class attributes, but also the types of nodes, data-attributes, etc.
/* Using unique id value */
const parentElement = document.getElementById("two");

/* Using a CSS selector */
const anotherElement = document.querySelector("li.hot");

/* Multiple nodes using CSS child selector */
let allChildren = parentElement.querySelectorAll(":scope > span");
| Extra: All of the W3C selectors.
So, querySelectorAll() returns a collection including all the specified elements. You can then iterate over this collection with a typical for-loop, or its functional alternative, the forEach().
Warning
While you can call querySelectorAll().forEach(), you cannot do the same with getElementsByClassName()! querySelectorAll() reutrns a NodeList, while getElementsByClassName() returns a HTMLCollection. In that case, just substitute the forEachwith a normal for-loop.
/* Using querySelectorAll */
const x = document.querySelectorAll("li.hot");

/* Looping through the collection */
for (let i = 0; i < x.length; i++) {
  const xi = x[i];
}
A reference to a collection of all of the elements that belong to a particular class can be obtained with getElementsByClassName().
/* All elements with a class "hot" */
const x = document.getElementsByClassName("hot");
You can also obtain a collection of elements having a certain tag name by using the getElementsByTagName().
/* Returns a collection of all the <li> elements */
const x = document.getElementsByTagName("li");
Of course, the getElementById(), getElementsByClassName(), and getElementsByTagName() can be substituted with the querySelector() or quesrySelectorAll() and a suitable CSS selector, but there's one special got'cha explained next.
Live and static collections
Collections that are returned through the use of getElementsByXXX() are 'live': they are updated when the document is changed. Add or remove an element on the page and the collection changes to reflect this.
Collections returned through the use of querySelectorAll() are 'static': they reflect the state of the document at the point of time when the query was executed. Changes that happen on the page at a later time are not reflected in this collection.
Adding elements to the DOM tree
We can use JavaScript to create new elements and to add them to the DOM tree.
Elements can be created with the createElement() method and text nodes can be created with the just as aptly named createTextNode() method. These new nodes, however, are not part of the document just yet. Nodes can be appended to the document with the appendChild() method.
Let's illustrate this process through an example. First, we create a new element of type h2 (for level 2 heading). It now exists, but is not yet a part of the document and does not even contain any text. We then create a new text node with the text "Header!" and append this text node as a child of the header node. Finally, we hunt down the element with the id page and append the header node as its child. The text node remains a child of the header node.
/* Let's create new h2 -header with text: "Header!" */
const newHeader = document.createElement('h2');
const text = document.createTextNode("Header!");

// Appending the text node to the header node
newHeader.appendChild(text);

// Appending the new h2 -header to a div in the document
const parentDiv = document.getElementById("page").appendChild(newHeader);
Changing text of an element
So, the text is its own text node, instead of, for example, an elements attribute. Still, we access the element's text through the element by using its innerText property. Because of this, we also have another way of creating elements with text: instead of creating dedicated text nodes and making them the children of other nodes, we can also just create an element and set its innerText property.
/* Let's create new h2 -header */
const newHeader = document.createElement('h2');

// and chage its innerText to Hello World!
newHeader.innerText = "Hello World!";

// Appending the new h2 -header to a div in the document
const parentDiv = document.getElementById("page").appendChild(newHeader);
Adding elements to the DOM tree
Above we saw, that the innerText property could be used to implicitly create and set a text node. We can actually use a similar method to create elements as well, with the use of innerHTML. As the DOM tree is, well, a tree, it is easy to create a bunch of child and grandchild nodes to any (non-void) element.
/* Writing code inside h2 -element. */
const newHeader = document.createElement('h2');

// Adding text inside the element
newHeader.innerHTML = "<strong>Great</strong>" + "job!";

// Inserting the node into DOM
const parentDiv.document.getElementById("page").appendChild(newHeader);
createTextNode() and innerText can add and modify only text. innerHTML does not share such limitations, and can be used to create HTML elements as well.
Removing elements from the DOM tree
Elements can be removed from the DOM tree with the use of removeChild() method. But here's the catch: you can't actually remove an element, you can only remove an element's child. So, to actually remove element X, you would need to form a reference to X, travel the DOM tree to the parent node of X, and then remove its child with the reference to X.
/* Removing element */

// Store the element to be removed into a variable
const removeThis = document.getElementById("loseThis");

// Store the parent element into a variable
const parent = removeThis.parentNode;

// Remove the element from its parent
parent.removeChild(removeThis);
Document fragment
A document fragment is a special DOM node that wraps multiple nodes, and most importantly, does not have a parent node. When inserting into the DOM, the contents of the document fragment are added instead of the fragment itself.
This makes them handy in adding similar fragments to the DOM tree. Imagine, for example, rows to a table, or inputs to a form. An online form for employee recruiting might have a file input at the end for submitting your CV. It might also have an option to add more file input elements for a cover page and portfolio, etc. These could be added to the page using document fragments, instead of creating multiple label, input, and textNode nodes.
Or with a table, the HTML might at first look like this:
<table>
  <thead>
    <tr>
      <th>Name</th><th>Age</th>
    </tr>
  </thead>
  <tbody>
    <tr>
      <td>Mark</td><td>24</td>
    </tr>
    <tr>
      <td>Mary</td><td>27</td>
    </tr>
  </tbody>
</table>
Then we might have a document fragment, like this:
/* Fragment that represents a new row */
const fragment = document.createDocumentFragment();

// create the elements for a table row
const tr = document.createElement("tr");  // table row
const td1 = document.createElement("td"); // first td
const td2 = document.createElement("td"); // second td
tr.appendChild(td1);
tr.appendChild(td2);

// add the row to the fragment
fragment.appendChild(tr); // adding tr will also add its children (td1 and td2)
And finally, we can use the fragment:
/* Assume fragment is the same fragment above */
// Clone the DocumentFragment so it can be used multiple times
let clonedRow = fragment.content.cloneNode(true);

// First find the <td> elements inside the fragment
let firstTd = clonedRow.querySelector("td");
// querySelector() the first match - querySelectorAll() returns every match
let secondTd = clonedRow.querySelector("td:last-child");
// find the td that is the last child of its parent (tr)

// Modify the contents of the td elements
firstTd.textContent = "Jack";
secondTd.textContent = "31";

// Append the cloned fragment inside the tbody of the table
tbody.appendChild(clonedRow);

// Add another person, clonedRow, firstTd, secondTd are re-used with new values
// Clone the fragment again and find the <td> elements and modify the values and append to the table
clonedRow = fragment.content.cloneNode(true);
firstTd = clonedRow.querySelector("td");
secondTd = clonedRow.querySelector("td:last-child");

firstTd.textContent = "Jill";
secondTd.textContent = "22";
tbody.appendChild(clonedRow);
After the changes, the HTML will look like this:
<table>
  <thead>
    <tr>
      <th>Name</th><th>Age</th>
    </tr>
  </thead>
  <tbody>
    <tr>
      <td>Mark</td><td>24</td>
    </tr>
    <tr>
      <td>Mary</td><td>27</td>
    </tr>
    <tr>
      <td>Jack</td><td>31</td>
    </tr>
    <tr>
      <td>Jill</td><td>22</td>
    </tr>
  </tbody>
</table>
Seems tedious? Luckily, there's also <template>.
Template
A <template> serves document fragments for scripting purposes - its content property returns DocumentFragment. A <template> enables skipping the manual element creation of the previous example.
Browsers ignore templates but do check their validity. JavaScript, on the other hand, can use templates for DOM manipulations.
Let's refactor the previous DocumentFragment example with a <template>:
<table>
  <thead>
    <tr>
      <th>Name</th><th>Age</th>
    </tr>
  </thead>
  <tbody>
    <tr>
      <td>Mark</td><td>24</td>
    </tr>
    <tr>
      <td>Mary</td><td>27</td>
    </tr>
  </tbody>
</table>

<template>
  <tr>
    <td></td><td></td>
  </tr>
</template>
And the code:
// First find the tbody and the template
const tbody = document.querySelector("tbody");
const template = document.querySelector("template");

/* Clone the fragment and then find the <td> elements
inside the fragment */
let clonedRow = template.content.cloneNode(true);
// content above is a DocumentFragment
let firstTd = clonedRow.querySelector("td");
let secondTd = clonedRow.querySelector("td:last-child");

// Modify the values and append to the table
firstTd.textContent = "Jack";
secondTd.textContent = "31";
tbody.appendChild(clonedRow);

// And then the second row
clonedRow = template.content.cloneNode(true);
// content above is a DocumentFragment
firstTd = clonedRow.querySelector("td");
secondTd = clonedRow.querySelector("td:last-child");
firstTd.textContent = "Jill";
secondTd.textContent = "22";
tbody.appendChild(clonedRow);
We've now seen HTML elements together form the DOM tree and how JavaScript can be used to interact with the nodes of the said tree. In addition to direct manipulation of nodes, we can also listen for events that the browser raises when certain things take place.
Events
The "something happened" signals.
When something happens, the mouse moves hovers over elements, clicks, a keypress is detected, a scroll takes place, a form gets submitted, or even when the document is done loading, the browser triggers an event that is passed to its listeners.
All DOM elements are capable of generating events and the variety of events is large, as seen above. These events can even be forced to take place through JavaScript - a button can be clicked programmatically, for example.
| Extra: Check the long list of events at Mozilla Developer Network - Events.
Listening for and reacting to events
In JavaScript, listeners can be set to listen for certain types of events, such as click or submit. This can be done using the addEventListener() method on an element (or even the document itself for a "global" event listener).
// Listening for a button click (assume the <button> element is in the variable button)
button.addEventListener("click", function(event) {
  // code here will run every time the button is clicked
});

// Listening for a form submit event
form.addEventListener("submit", function (event) {
  // handle submit event here
});

// Listening for the document to finish loading content
document.addEventListener("DOMContentLoaded", function(event) {
  // the code that handles this event will go in here
});
Listeners can also be removed. This is done using the removeEventListener() method.
Event propagation
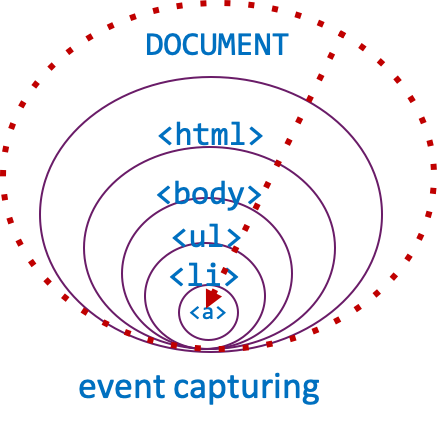
When a link is clicked, a click event happens. If this causes the browser to load another page, the event propagation is terminated, but in a scenario where a full page load does not occur, such as with an internal link, the event bubbles. This starts from the most specific element, that is, the link itself further in the hierarchy: in the example below, first to list item <li>, then to list <ul>, then to body <body>, and finally to the document.
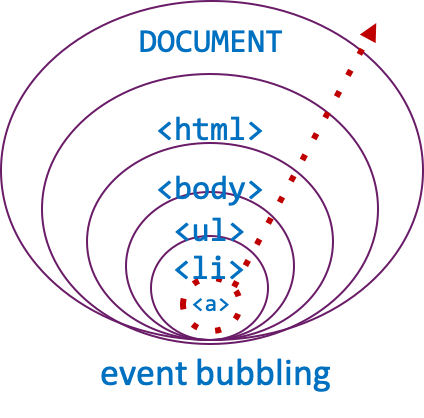
The opposite direction is called capturing: event moves from document to the specific element. The direction matters: any listener may stop the propagation, for example.
Let's say, for example, that upon submitting a form, you want to validate its data through JavaScript and only allow it to reach the server if the validation passes. To do this, you might add a submit event listener to the <form> element. Here, you can do all the validation you want, but unless you stop the event propagation (using event.preventDefault()), the event will reach the document and the browser will perform a form submission. This is the browser default action for this event.
Warning
Note, that you should NEVER rely on client-side validation alone, as this is super trivial to bypass, even unintendedly.
Browser default actions
For certain events, a browser performs default actions. For example, if a form submits button is pressed, this results in automatic form submission. If a link is pressed, this results in moving to the href'ed document. Often, default actions result in leaving the current page. Thus, some listeners get no chance to handle the event.
Default action can be prevented with event.preventDefault(). For example, if you have a link with an id l1 (<a href="/contact" id="l1">Contact us</a>), we can intersect click on that link and prevent the default action like this:
const link = document.getElementById("l1");

link.addEventListener("click", function(event) {
    event.preventDefaultAction();

    // Do something else instead
    alert("Do not contact us, we'll contact you.");
});
Video: Bringing it all togerher
In this video, we'll build a simple HTML form and receive it's values using our Node.js server.
We set the form method to POST, which causes the input values to be placed in the request body. If we would use method GET, the request body would be empty and the input values would be encoded in the URL as query string parameters. So, your server code needs to function differently when reading GET data and when reading POST data. Most frameworks will hide this difference behind some method.
Summary
We have now gathered a good understanding of HTML inside a browser. By now, we should be able to present content as HTML. Let's next move on to styling that content.
Ask yourself
- What is the difference between
divand semantic tags such asarticleorsectionand why should we move towards more semantic tagging? - What is the effect of nesting in HTML on the DOM tree?
- Can you understand HTML as a DOM tree and a DOM tree as HTML comfortably?
- Do you know how to add, modify, and remove DOM tree nodes using JavaScript?
- Can a DOM tree node remove itself using JavaScript?
- Do you know how to intercept browser events and how to stop intercepting them?